I awoke this morning to see that not a leaf on the hornbeam was fluttering, and my head fell back to the pillow in dismay. This was a sure sign that I had a new hobby. It was the KAPer’s lament: no wind. I had flown a camera on a kite for two days in a row, and the thought of a calm day was discouraging. But I had started a stitch of yesterday’s aerial panorama before I went to bed, so I got up two hours before Galen had to be at school to check on it.

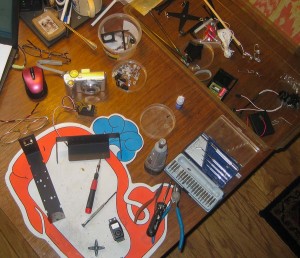
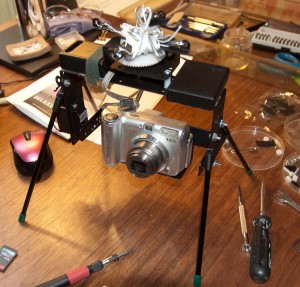
I built my first KAP rig last week from one of Brooks Leffler’s kits. I have never built anything with servos and dip switches and carbon fiber legs, but I got to use my Dremel tool, so it felt safe. Brooks has designed an elegant system for suspending a camera so that it can point in any direction. The pointing and shutter release are done either at predetermined intervals (autoKAP), or by radio control from the ground. The kit I built had servo motors for both panning and tilting and electronics to automatically point in as many as 76 directions and take photos potentially covering a downward-looking half-spherical view. By replacing the tiny circuit board with a radio receiver, the motors and shutter could be controlled via a transmitter on the ground. It is based on the RC airplane/car/boat/helo standards, so compatible equipment is readily available.
.

Kite aerial photography (KAP) is a mature hobby, and I thought I was buying a build&fly system. But my kit included electronic components manufactured by two independent KAPers in Europe. Both components have at least two versions, and information about how the versions interact with one another is scarce. I thought I had done plenty of research before ordering my kit, but I did a lot more while trying to get it to work. Browsing the online forums failed to answer my questions, so I asked Brooks. He was not sure how the gentWIRE-USB2 worked with the AuRiCo 133b, so he copied his reply to James Gentles who makes the gentWIRE. James generously replied and confidently contradicted much information on the forums, confirming that his cable protected the camera from damage by 6 volts from 4 AAA batteries, and that my system would always release the shutter twice at each pan/tilt position. Apparently the AuRiCo sends a pulse to start and another to stop (e.g., a servo), and the camera was firing at each signal. He also reported that his other cable (gentWIRE-USB) did not trigger the camera twice, and that neither did the other AuRiCo version — it was just the combination that I had chosen.
A north wind was gusting to 30 mph on Monday, and the sky was clear. That was a lot of wind for a beginning kiter like me, but it would keep the kite flying as long as I could hold onto the line. And full sun makes photography simple. So I met Preston and Christine in a pasture down by Otter Creek. I thought an aerial image of the annual spring flood would be a worthwhile objective, although I had little confidence that attaching my new $400 KAP rig to a kite line in wind like that was wise. But once the kite was aloft, the line seemed like it could lift a DSLR and maybe a small lawn tractor. So we launched the system. The Picavet suspension held the KAP rig perfectly level whenever it was not being jerked around by the constantly zooming kite, so never. This was a practice flight, and I did not expect any usable photos. I didn’t really get any, but that is because I forgot to focus the camera, and everything beyond 15 feet was out of focus, in every photo (but check out the crisp kite line!). The camera captured 267 blurry photos during a 25 minute flight, and I was surprised that 26 of them stitched together to make a nice fuzzy panorama of the flooded fields. I was really pleased that everything except the focus had gone well. Except for losing one of the fancy carbon fiber legs. And except getting thrown out of the field by the farmer for trespassing. KAP has a steep learning curve.
.
.
The same north wind blew all day Tuesday, but it was only gusting to about 20 mph, so I went to Preston and Christine’s house which is surrounded by big hayfields and not so many kite-eating trees. The kite flew earnestly again, so I sent up the rig, this time focused on infinity, and at a fixed exposure (1/1000 sec at f5.0). There was no danger of the kite losing loft, but again there was lots of nasty whipping about up there. The rig was taking two photos at four different tilt angles at each of 19 azimuths. The rotation repeated a few times during the flight. The idea was to get photo coverage of a 360° panorama from the horizon to the nadir. But the flailing KAP rig was so unlike a GigaPan imager, which precisely rotates the camera around the entrance pupil of the lens, that I was doubtful I would get very good coverage of most of the scene. The fact that the rig was taking two shots at each position was probably the key feature of the system that provided adequate coverage for stitching. Pure genius.
The camera captured 820 images during its 45 minute flight. Lots of those were during ascents or descents (I pulled it down once to check on things), but it made a couple of full rotations at height. Last night it took a long while to select a set of photos that seemed to form a four row 360° panorama. GigaPan Stitch was not pleased with my selection and created an apocalyptically ruptured landscape, so I served it to Photoshop Photomerge and went to bed.
It was very early on this windless morning when I found a polite dialog box announcing that Photomerge had crashed. I think it is just not designed for that many images. This exhausted my stitching arsenal, so I browsed the GigaPan forum and found a mention of Microsoft ICE (Image Composite Editor). I did the free download and five minutes later, before breakfast, ICE had made a decent 360° near half-spherical panorama.
Unlike GigaPan Stitch, but like Photomerge, ICE does not need to know in advance where the images belong in the panorama. It figures that out. But I could not find a set of photos that would stitch without a few nasty thrust faults where they did not belong. Some attempts were almost as scary as the GigaPan result. Having become familiar with the 820 photos (using Lightroom), I was able to select a 4×17 grid of them that seemed to cover the scene, and used the “structured” option in ICE. It iced it the first time. There were still a few gaps around the edges, and some inappropriate faulting in the distance, but it was the tenth attempt, and I output to jpg, added a few of Preston’s action shots, and uploaded it to gigapan.org. I also gave GigaPan Stitch a shot at the new 4×17 matrix, but the apocalypse returned.
.
.
The two KAP images I have put at gigapan.org are the smallest panoramas in my collection there. They have much less detail than the others, and the stitching is far from flawless. In time there should be incremental improvements in all of these measures, but I hope that my relatively low-resolution KAP panoramas will inform in new ways. Planes and helicopters are not allowed to fly as close to the ground as a kite can, and I hope there are patterns to reveal from this unique vantage that might be of value.
And I hope the tree outside my window is fluttering tomorrow morning.
Here is the hayfield panorama at gigapan.org: http://www.gigapan.org/gigapans/77130/. Try “View in Google Earth 4.2+” to get the half-spherical effect.

Ortho from PhotoScan
http://gigapan.org/gigapans/76083/
I find obliques quite challenging. I don’t have any really large images to share. Here is one that is smaller
http://www.flickr.com/photos/n8craig/4571967701/
If you want to make large KAP panoramas, I would suggest two pieces of software. For oblique panoramas I use AutopanoGiga. For ortho panoramas, I use PhotoScan Pro. Great to see another FoFS KAPer out there!
Gee, most new KAPers start with a self-portait or two and some lopsided pictures of the schoolyard. You dive right in with panoramas! Wow! and with pretty good results! Well done, Chris.