
About 10 years ago I started making digital copies of old film negatives and color slides. The scanners I had access to produced disappointing results, so I tried taking a closeup of the film with a digital camera (Figure 1). The camera was the first DSLR I owned. This made very good copies, capturing most of the information in the old film. My more recent experiences with consumer scanners and commercial scanning services suggest that it is easy to get much better results using a camera than with a slide/film scanner.

I have never attempted to digitize all or any large part of the ~35,000 negatives and slides I have, but I use my little rig to do a few at a time when I need to. Today, using DSLRs to digitize film, slides, and prints is a preferred method for serious archivists including the Library of Congress and the National Archives. If done carefully the quality can be better than that from expensive scanners and it can be much faster and cheaper.
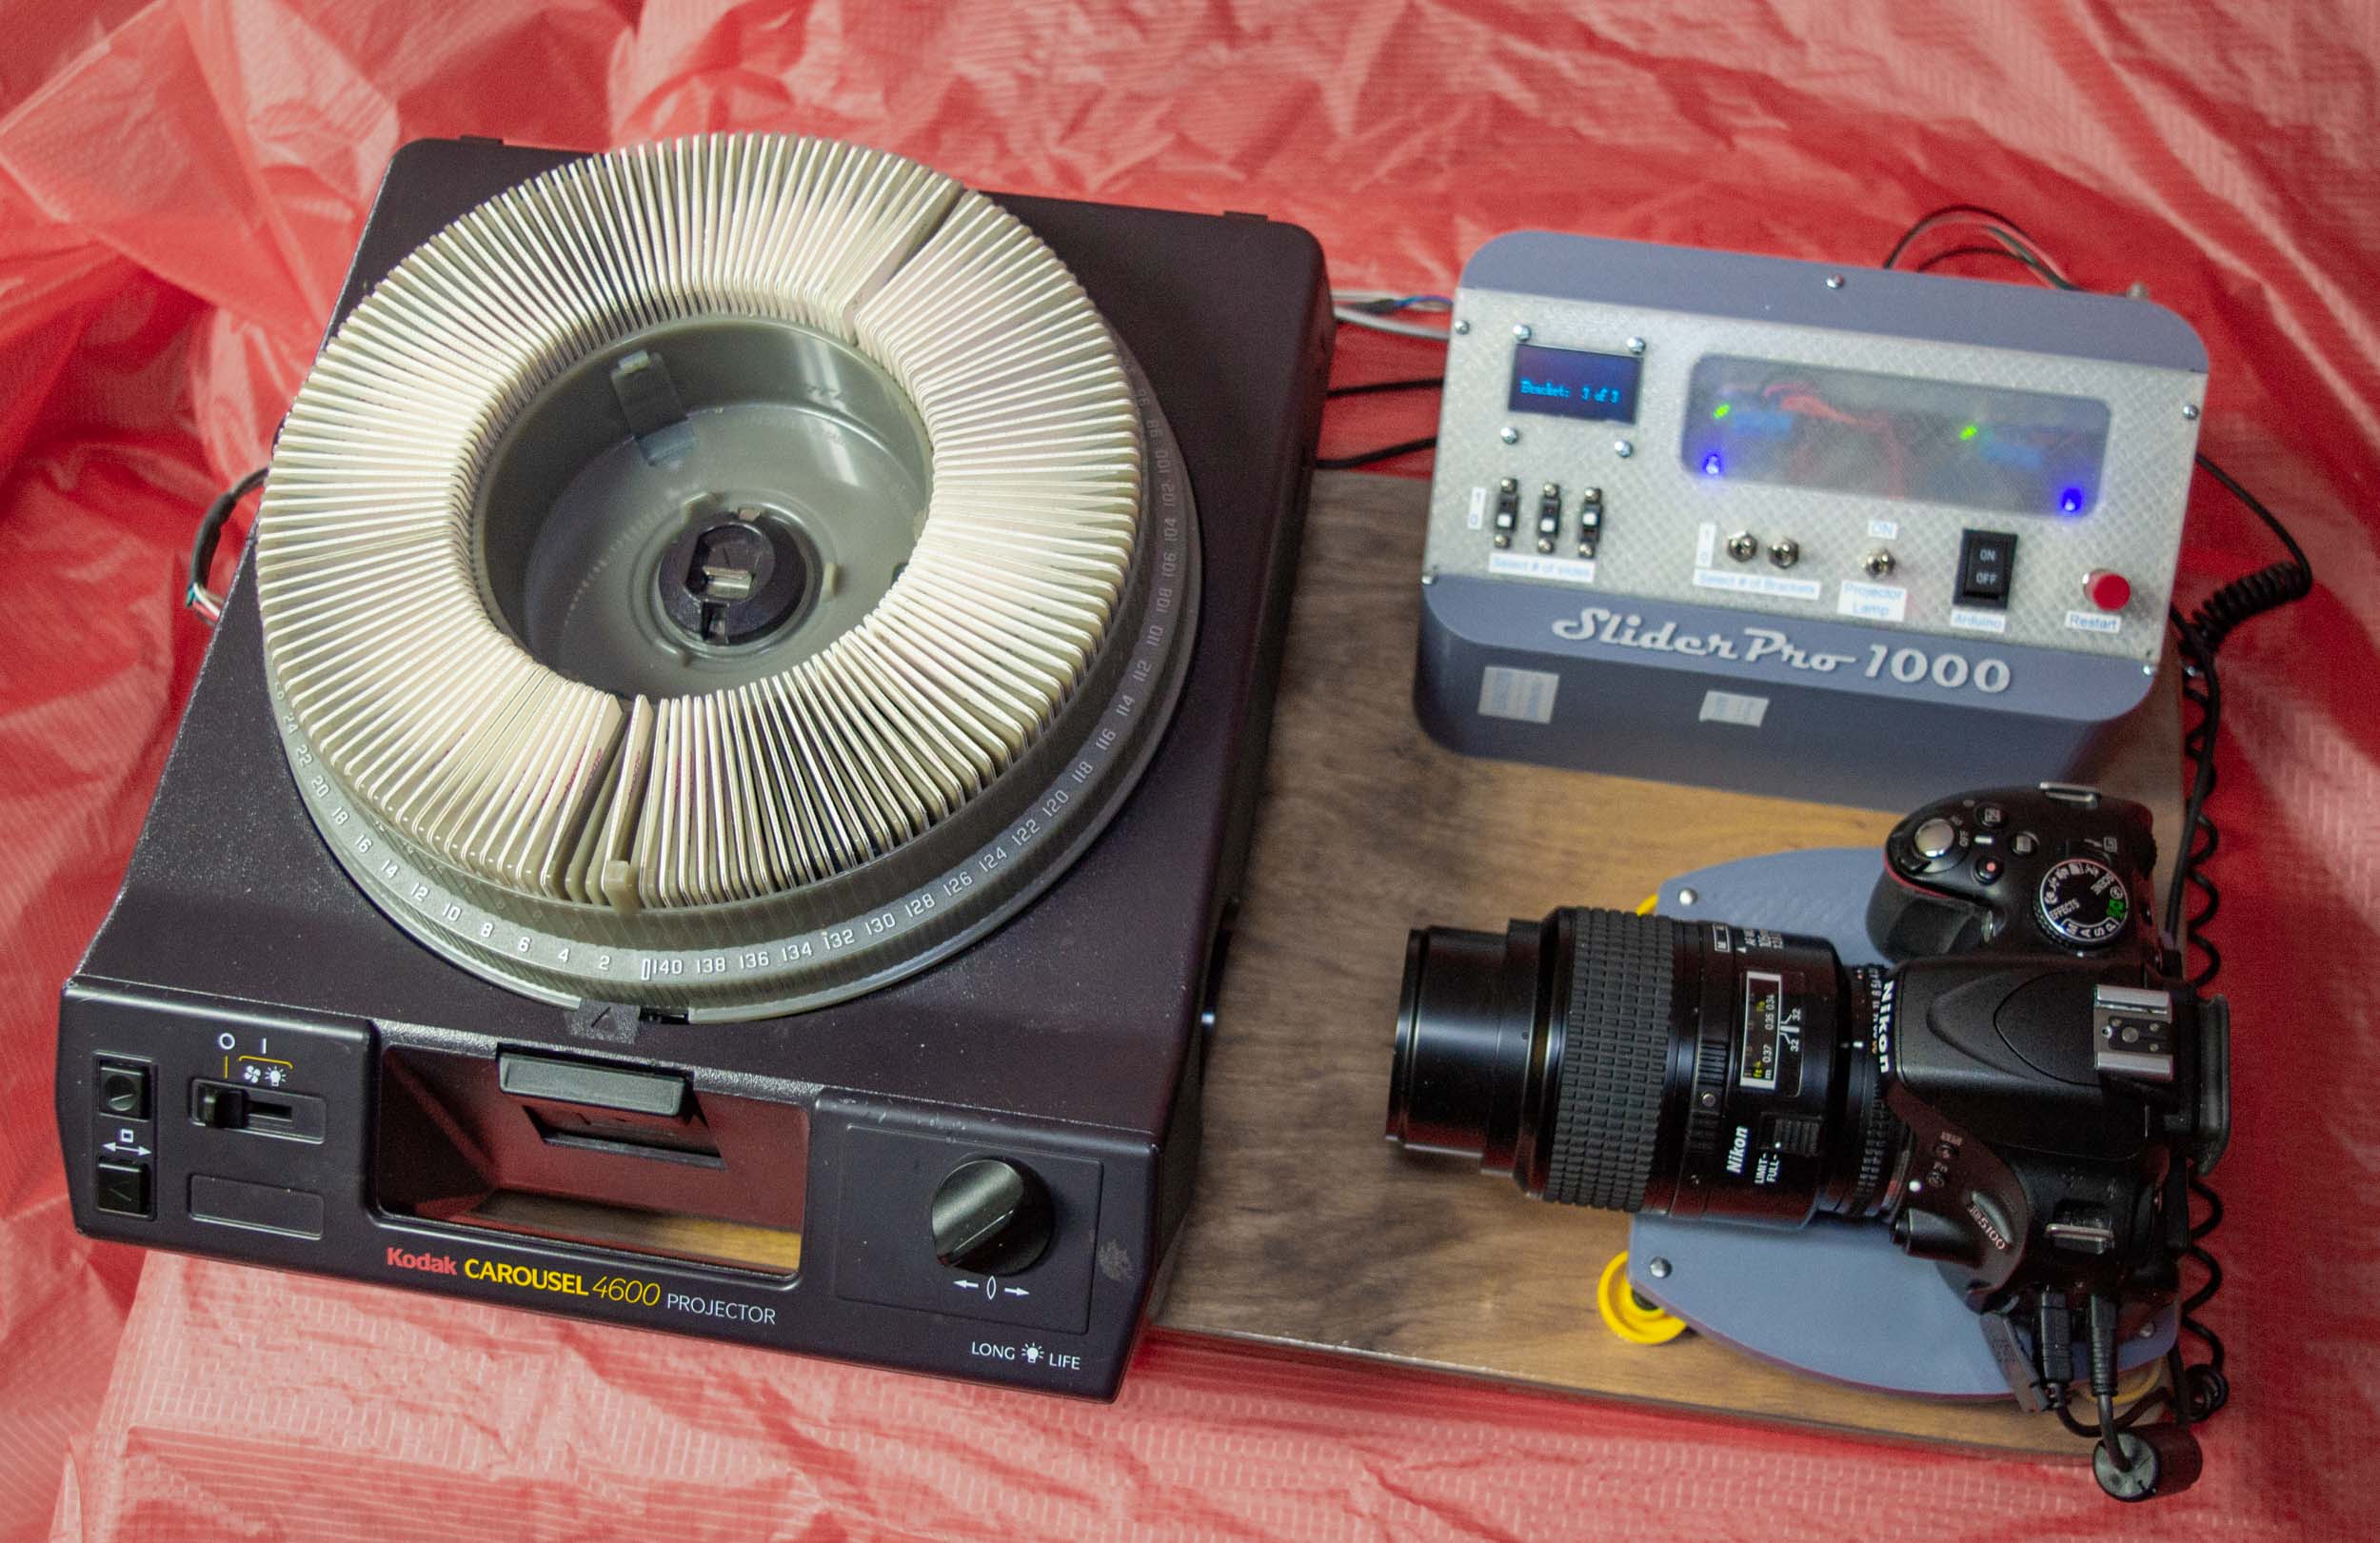
This year I learned that lots of people have been using old slide projectors to automatically copy entire trays of slides. I have three old Kodak Carousel projectors and now I have a use for one of them (Figure 2). In addition to a projector you need a digital camera and an appropriate lens. If you have these things, it’s easy to make excellent digital copies one at a time by manually triggering the camera and then advancing the projector to the next slide. Automating the process so an entire tray of slides is copied unattended requires about $20 of additional gadgets.
To make a few copies of slides, the projector is not needed. A good camera with a closeup lens can capture the image in a slide held in front of an uniform light source. As described below, the key to capturing all the information in the slide is a camera that can capture camera raw files (and knowing what to do with them).
Camera gear
In 2013 I upgraded to a 14 MP Nikon D3100 (model released in 2010) so I could capture more of the information in old film. That’s enough megapixels to record the grain (or dye) structure of film if you fill the frame with a 35mm negative or slide. Larger format film might require more pixels. The new plan to digitize hundreds of slides encouraged me to upgrade to the 16 MP Nikon D5100 (model released in 2011). I bought it used in “excellent” condition for $180 and was pleased to find a perfectly clean sensor and everything in working order. In addition to the extra two megapixels, the D5100 allows tethering to a computer running Adobe Lightroom (the D3100 does not). As each new slide is captured the file is automatically entered into my Lightroom database with the associated technical metadata and any custom metadata I create for that batch of slides. That feature is not very different from moving the files to the computer from the camera’s SD card and then automatically entering them into the database, but it is a little bit more awesome. The D5100 allows remote shutter release via special N3 cable or IR remote, a required feature if you want to automate the process.

My original 55 mm macro lens does not work when copying slides held in the projector because the lens cannot get close enough to the slide to fill the frame with the slide image. So I bought a longer focal length macro lens. I paid $160 for a used “Near MINT” Micro-Nikkor 105mm f/2.8D AF lens. This lens was released in 1990 and although automatic exposure (aperture priority) works fine when used on the D5100, automatic focus does not. That’s okay because all the slides will not require the same exposure, but they will be the same focus distance from the lens.
The new lens is much higher quality than my old macro lens and does not require an extension tube. That should result in a substantial improvement in image quality. Extension tubes move the lens away from the camera and allow only the center area of the image formed by the lens to reach the sensor. Consequently, less light will reach the sensor so longer exposures, wider apertures, or higher ISO are required. You are also asking the lens to perform outside of its design specification which might degrade image quality, but I don’t know how critical that is. The same thing happens when you use an old lens (like all of my film era lenses) with an APS-C sensor DSLR (like all of my DSLRs). The sensor is smaller than 35 mm film so only the center of the lens image is captured. Extension tubes compound this issue.

Preparing the projector
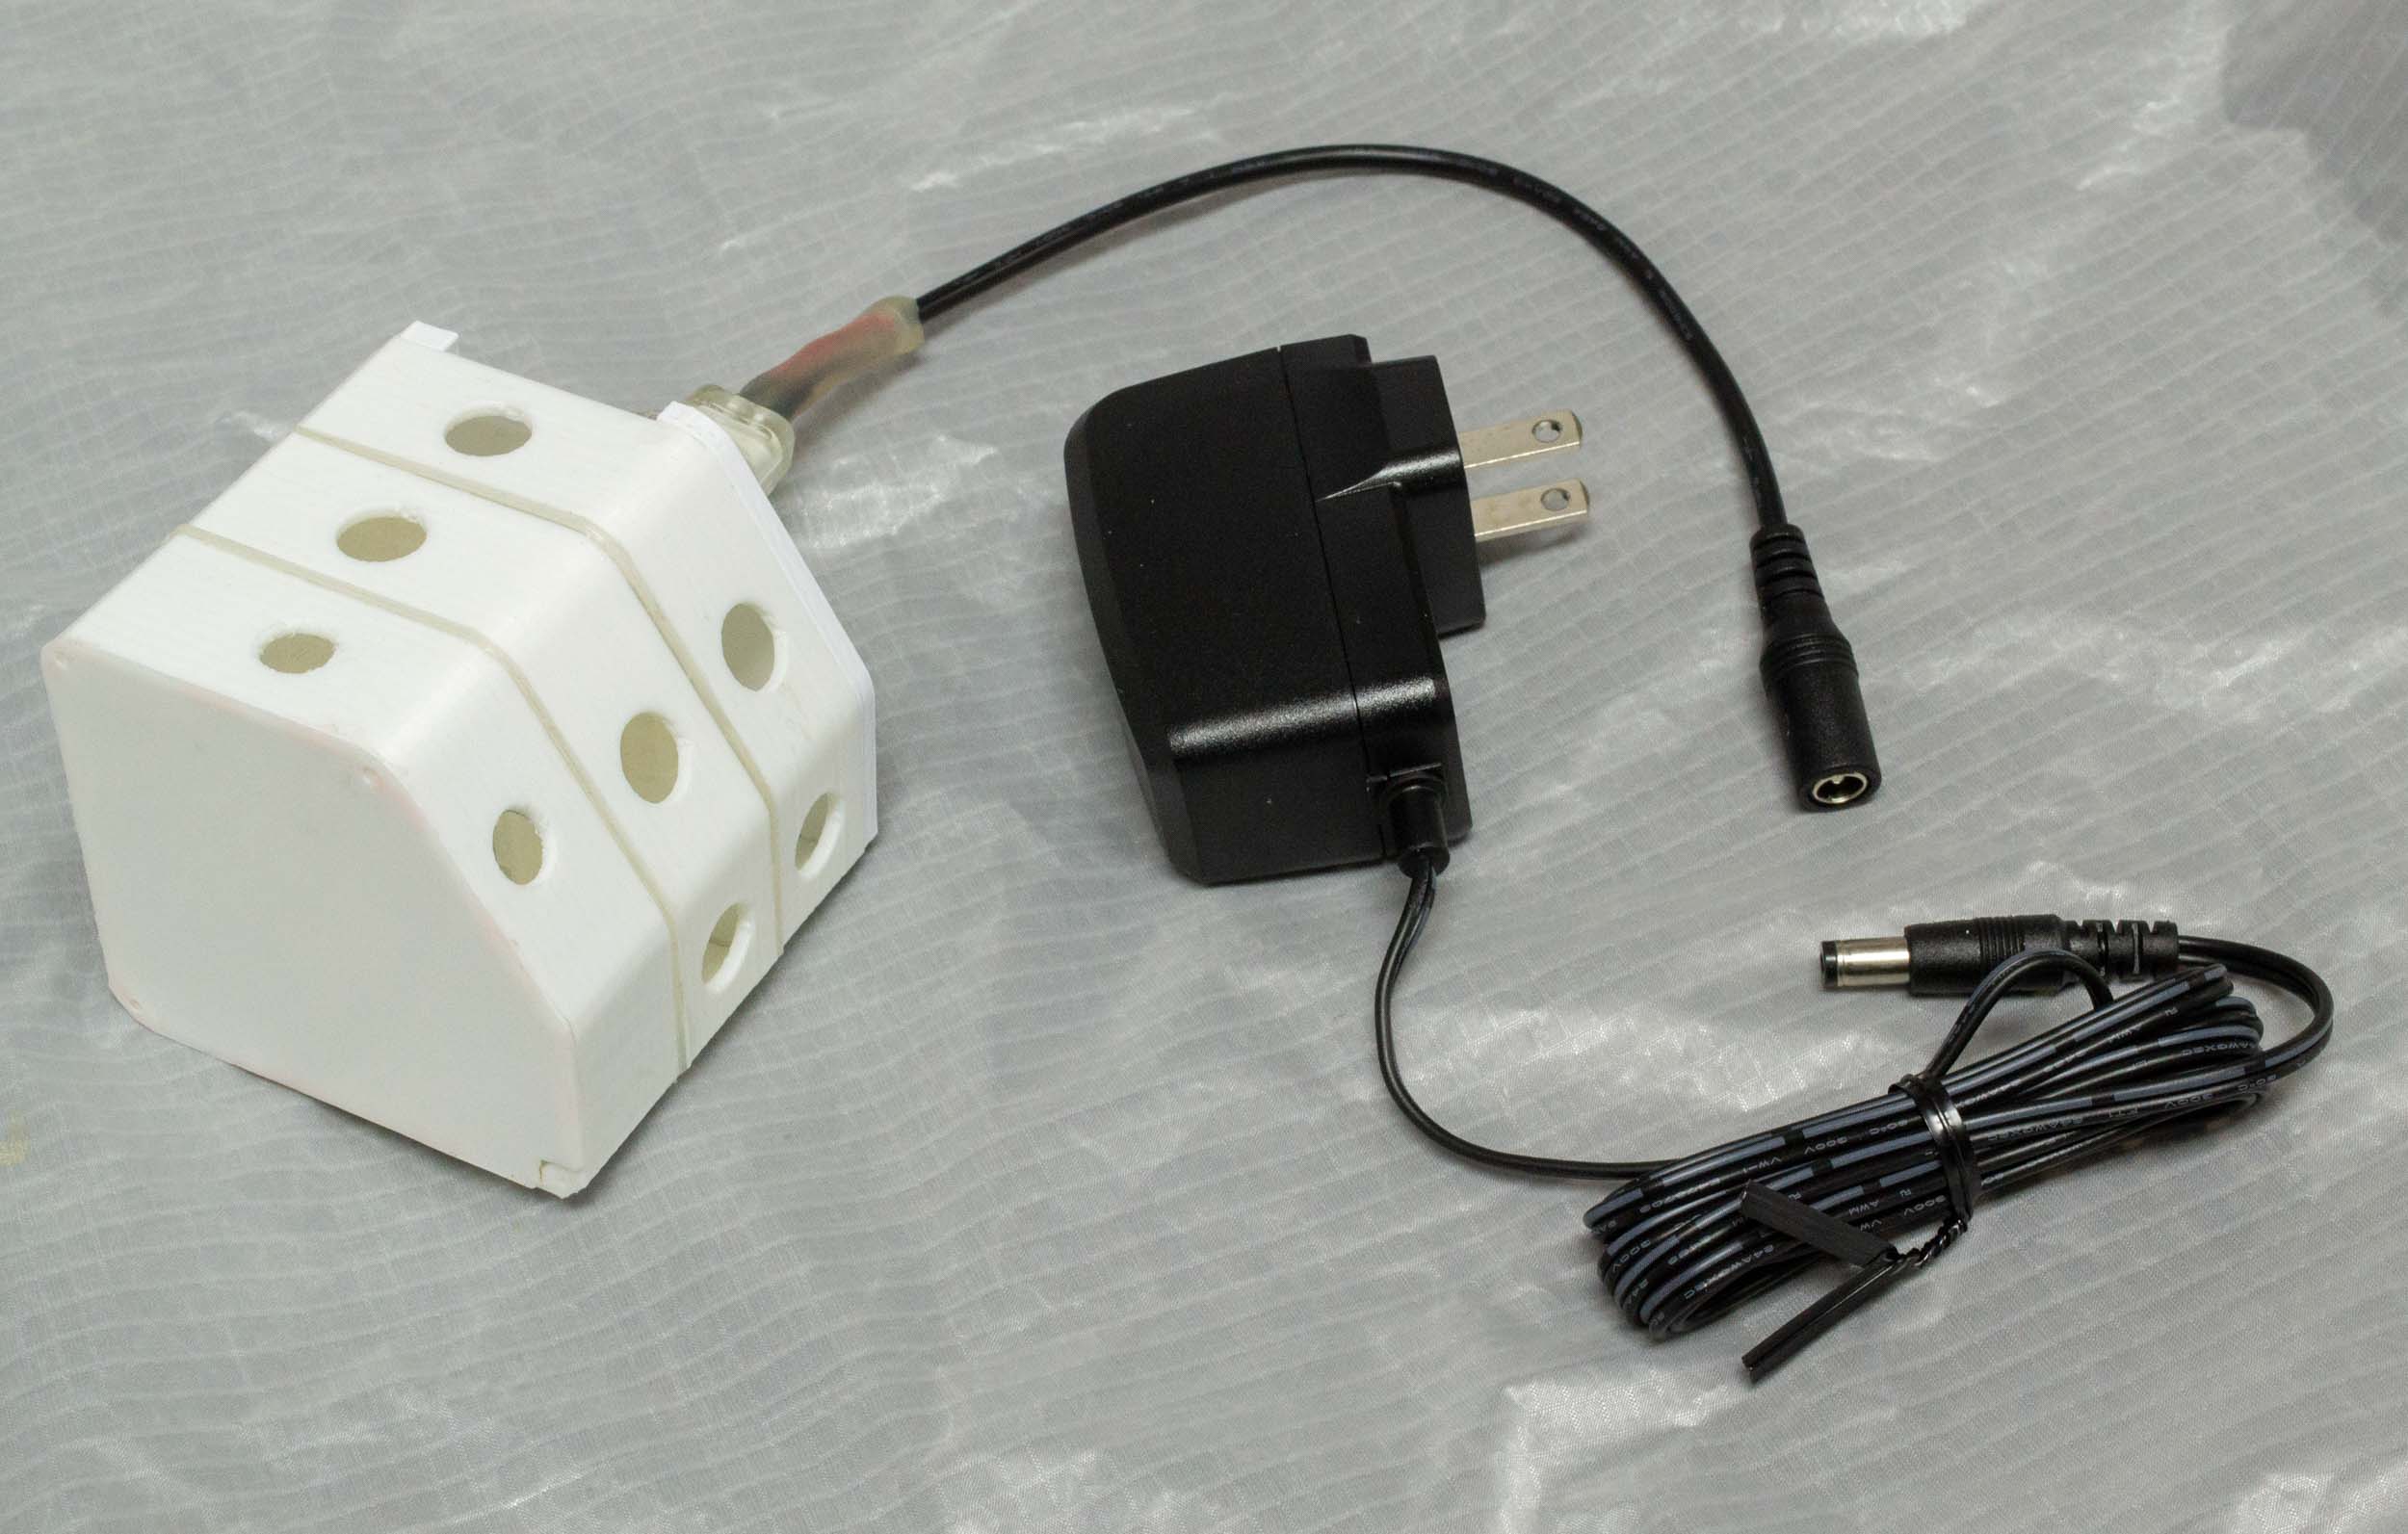
The only change I made to the projector was to replace the hot, fragile, and expensive halogen lamp (Figures 4 and 5). The projector can be converted back to normal use in five minutes. I never tried copying slides with the original projector lamp because I assumed it was too bright and woefully uneven.
The new $4.00 LED lamp is 2.5 watts but is equivalent to 30 watts, which is 10% as bright as the projector’s original lamp. It is also a 12 volt lamp, not 82 volts like the original. So the LED lamp needed a new power supply. It was easy to find an old 12 volt power brick in a box in the shed (or buy one for $4.00, 12 volts, 1 or 2 amps). I soldered leads to the two pins on the lamp and kept the pins away from the old 82 volt contacts.

I added two small sheets of diffusing film inside the lamp housing (Figure 6). These are critical to create an even illumination behind the slide. I got a generous donation of some Rosco #116 “Tough White Diffusion” material from Gary Oddi who used it in his pioneering slide copying setup. The Rosco material is like a Mylar tracing sheet and is designed to have minimal impact on color. It is also somewhat heat resistant which might be irrelevant because the new LED lamp does not get very hot (but don’t use the material near the original halogen lamp).

The Rosco diffusion material reduces the light transmission by one or two stops, so I had hoped one layer of it would be sufficient. But with only one piece between the mirror and the lens the light field was uneven (Figure 7). So I covered the mirror with a second piece and that eliminated more of the obvious unevenness. Closer inspection revealed that the edges of the slides were darker than the center (Figure 7.1).


I could not eliminate that vignetting, so I built a new lamp housing to completely replace the original one (Figure 7.2). The housing incorporates the same LED lamp and three new diffusing filters. The housing and filters are 3D printed. This unit gets inserted in the projector instead of the removable lamp housing that comes with the projector. After much trial and error, the housing illuminated the slide with no vignetting (Figure 7.3).

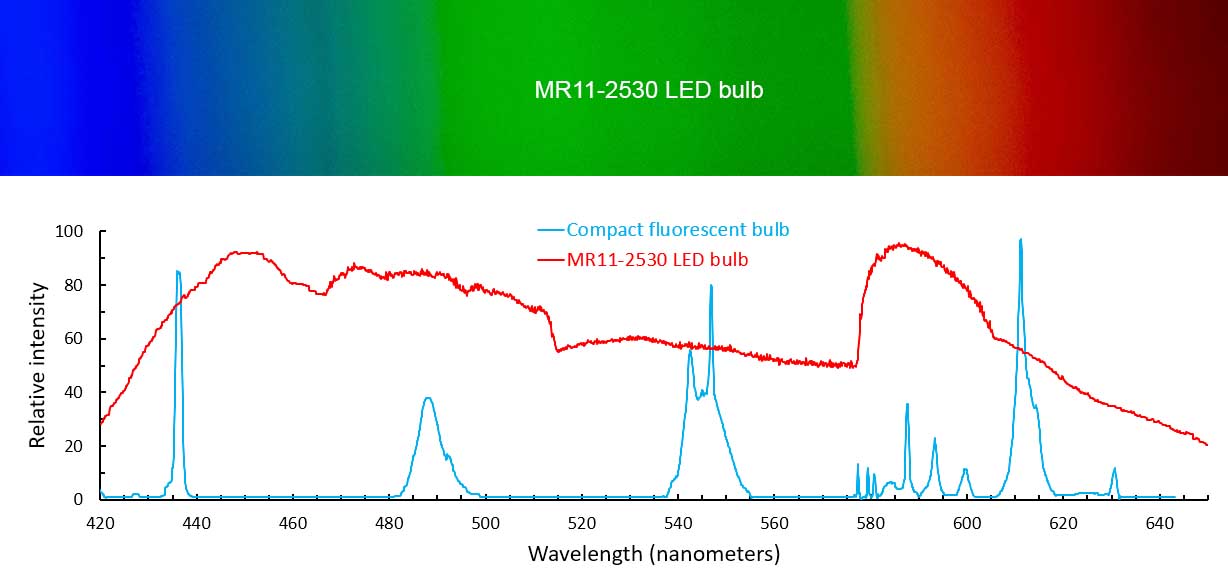
There is another way to illuminate your slides in the projector. Many Carousel projectors have a straight path from the lamp housing through the slide holder to the projector lens. On models that allow the lamp housing to be removed, when the lens is also removed you can look all the way through the projector or see the slide if one is chambered for projection. A table lamp that can be positioned to shine into the back of the projector might be all you need to backlight the slide. I don’t know how easy it would be to avoid vignetting. Also, don’t use a fluorescent bulb — they do not produce continuous spectra and could create color artifacts (Figure 8).
Alignment
There are two reasons to align the optical axis of the camera so it is normal (perpendicular) to the surface of the slide. First, if photographed at an angle to the slide, the image of the slide will be a trapezoid or trapezium, not a rectangle. Second, getting the entire slide in focus is more likely if the axis is normal to the slide. It is straightforward to use software to revert a trapezoid to a rectangle, but it adds a step. It is not really possible to fix poor focus, and focus seems to be one of the more critical issues with making high quality copies.

Perfectly aligning the camera and projector can be tedious. There are two simple ways to know if you are close. If the digital image of the inner edges of a slide mount is not a perfect rectangle, it is probably because the alignment is off. Because the slide is five inches inside the empty lens tube, the deviation from a rectangle will be subtle. Another approach is to make a 2″ x 2″ mirror slide (Figure 9) and have it dropped into the projector like a normal slide with the mirror toward the camera. If you take a photo of a mirror and the reflection of the camera lens is exactly centered in the image, then the camera optical axis was exactly normal to the mirror (Figure 10).

I spent a lot of time trying to align my system and learned that when the mirror indicated that all was perfect (Figure 10), a real slide would not be centered in the camera image. I never figured out why. Now when I am making final alignment, I stand back and look at the camera until it appears to be aligned, look through the camera and adjust until an illuminated slide appears to be level and centered, and take a photo. If the photo of the slide is a rectangle and not tilted, I’m ready to focus and copy hundreds of slides.
Camera settings
Non-negotiable settings:
- Check the camera sensor for spots or dust. No reason to add the same spot to hundreds of slide copies.
- ISO 100. The lowest ISO on the camera. It’s hard to find a reason for any other option.
- Aperture priority between f/8 and f/11. Most lenses produce the best image quality near f/8 and depth of field should be good enough there. With aperture locked, shutter speed will vary among slides and be slow which is fine because the camera and subject are not moving.
- Save RAW photo files. They are big files but you will need the latitude to adjust contrast, color, and other image parameters. Unless you are just not into it (in which case you might need to get into it).
Negotiable settings:
- The D5100 allows shutter delay so the shutter is tripped one second after the mirror flips up. This is not critical, but it can’t hurt.
- If your camera has autofocus, it is probably the best option. I have not tried it because I don’t have the option. Some cameras have “focus peaking” which shows you exactly when the image is focused. That might be really helpful.
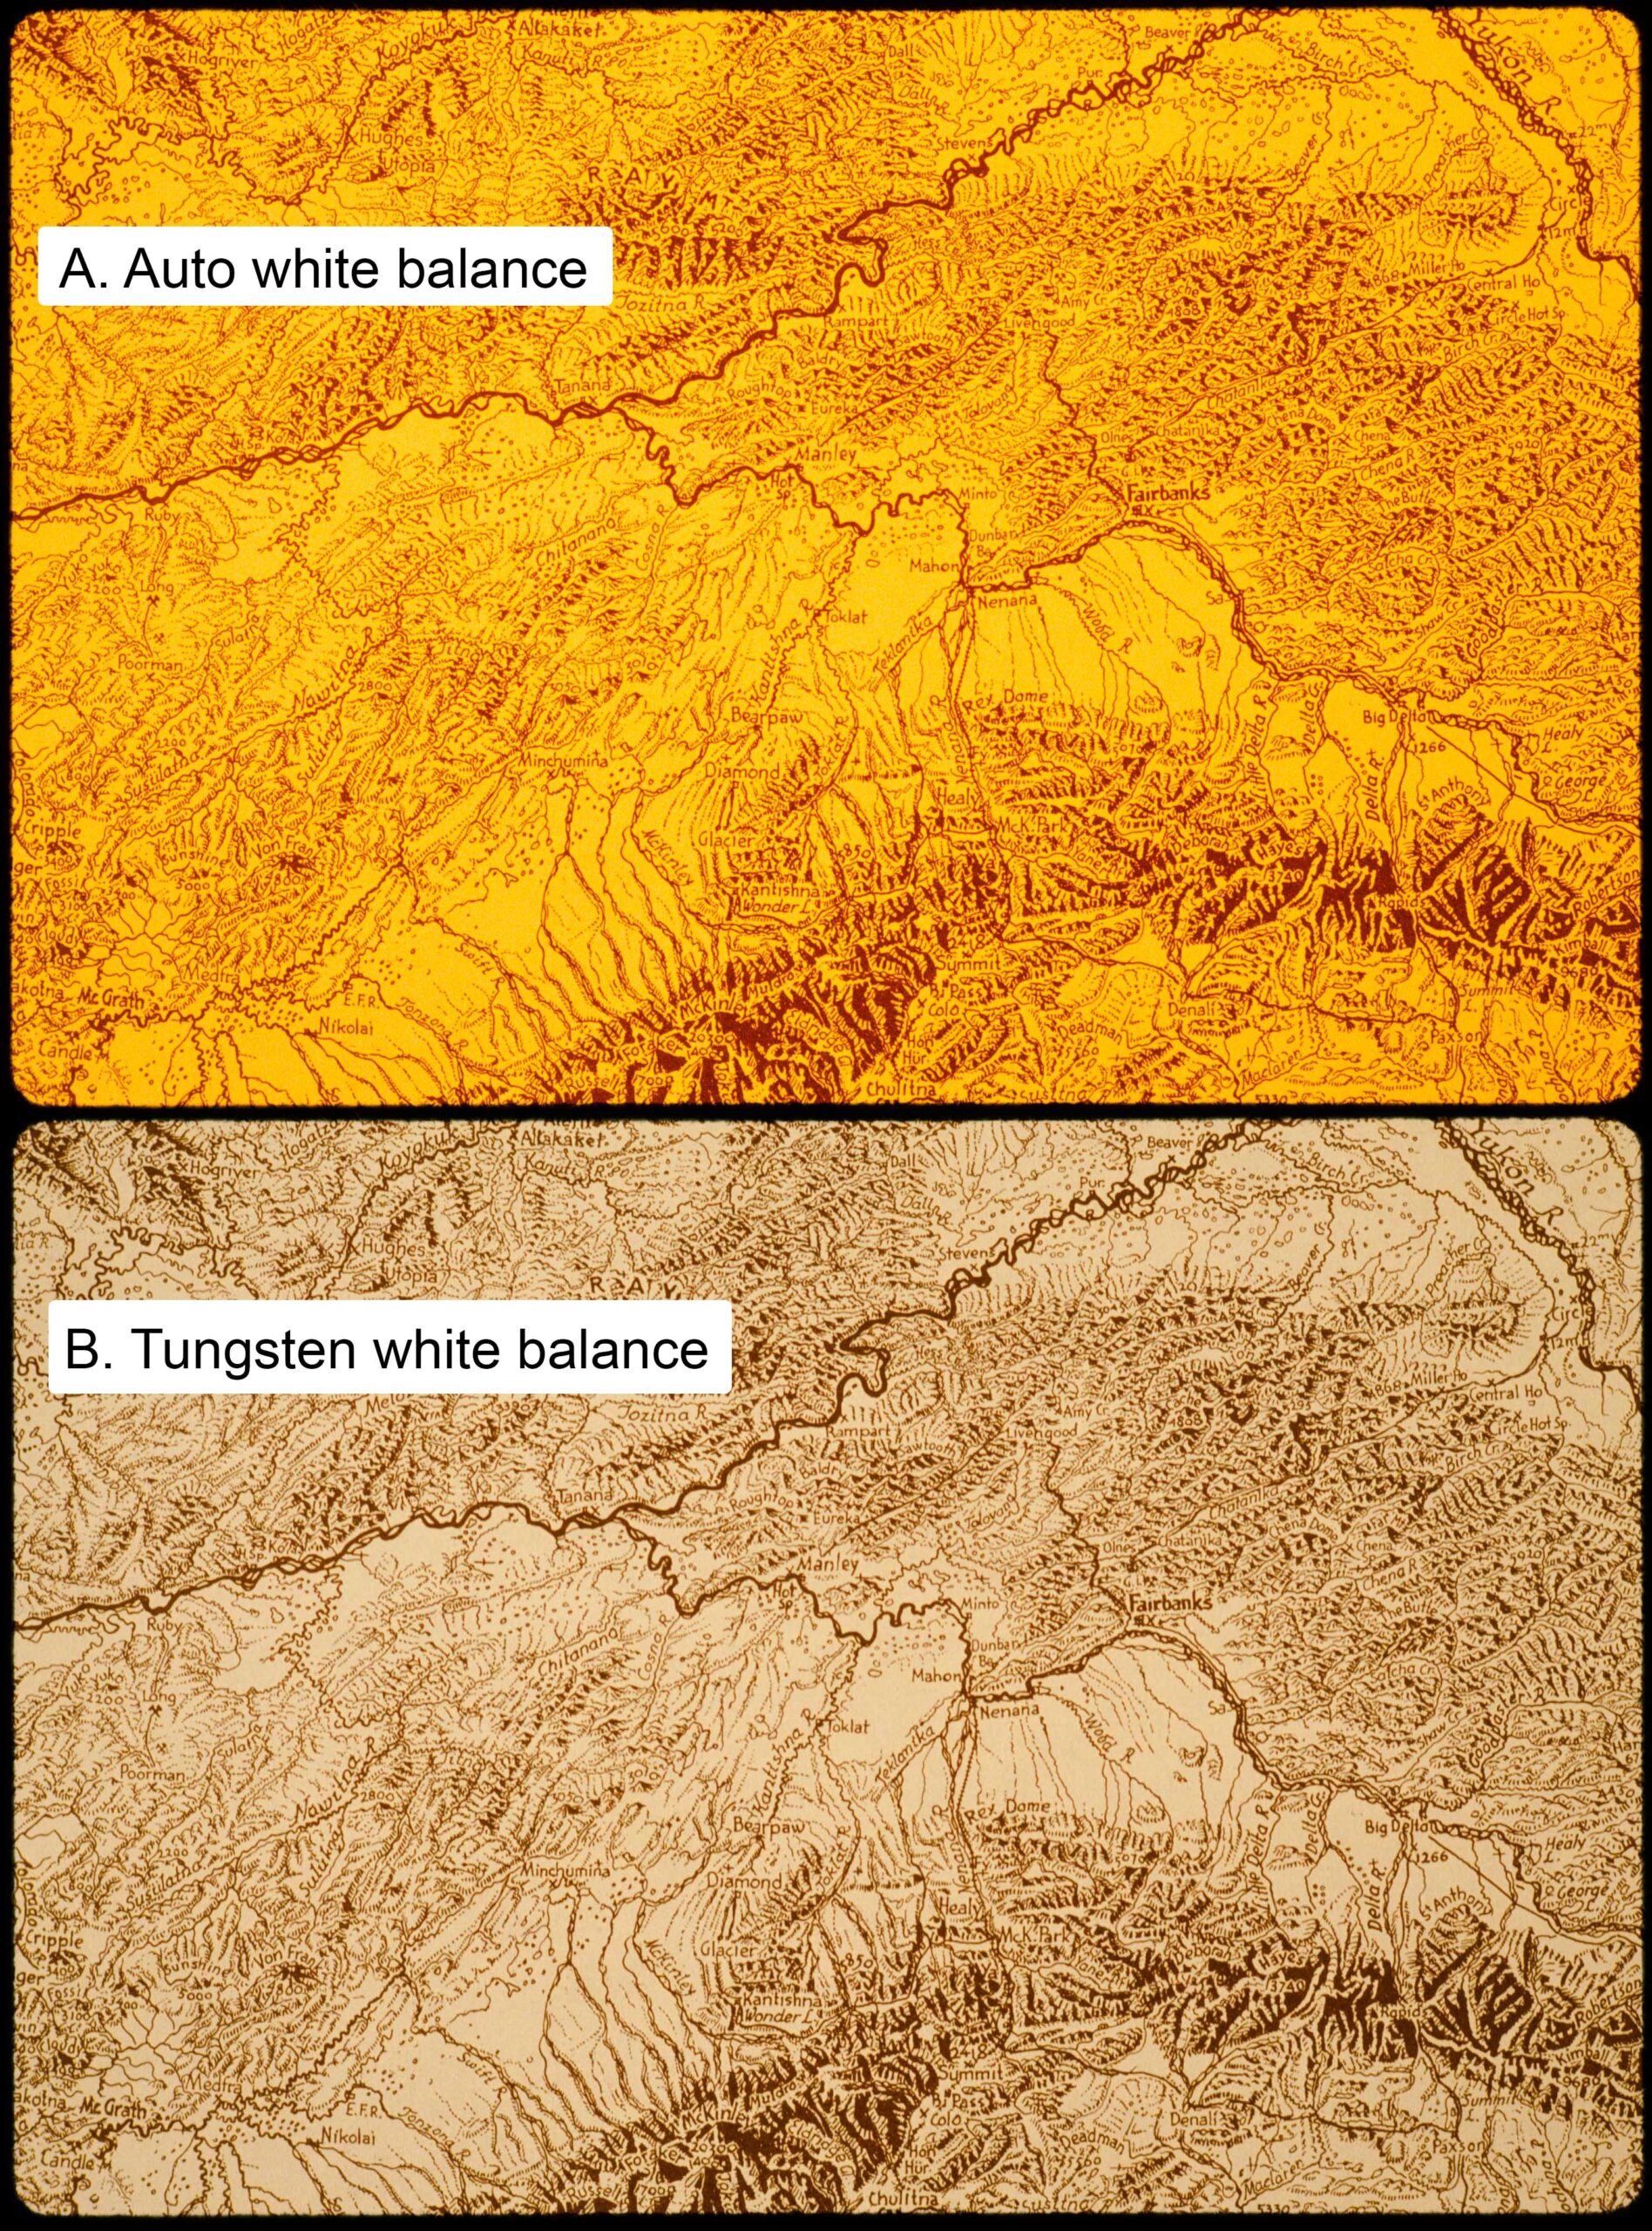
White balance: This depends on the light source used and the color of any diffusers added to the system. My new LED lamp is advertised as being 3000 Kelvin which puts it between the warm colors of tungsten and halogen lamps. I copied some slides of graphs with clear (white) backgrounds (see Figure 7) and the digital photos were orange. So I set the camera white balance to tungsten (incandescent) and most of the color went away (Figure 12). A more precise method is to find a discarded slide and cut the film out of the mount (or use a blank mount). With this empty slide mount chambered in the projector, use the custom white balance feature of the camera to set the balance on just the light that will be illuminating your slides. When done properly, a photo of a blank slide should be steely gray.
Adjusting white balance can also be done after-the-fact in software, but it is better to have the camera do it so your copies immediately reflect the true color in the slides. This is critical if you are saving jpegs instead of RAW.
Focus: I have to focus manually and I have been practicing. I focus on a slide, take a photo, then focus again on the same slide, take another photo, and so forth. Sometimes I miss, which tells me that I have to focus very carefully before I copy all 140 slides in a Carousel tray. I have not noticed that focus is compromised by variability in the projector’s positioning of each slide, but most of my slides are in standard Kodak cardboard mounts. Different types of slide mounts might have to be individually focused.
If you have good eyes and your camera has “live view” and a big display, you can display the live image on the screen and zoom the image to focus. On my D5100, this seems to work a little better that looking through the viewfinder.
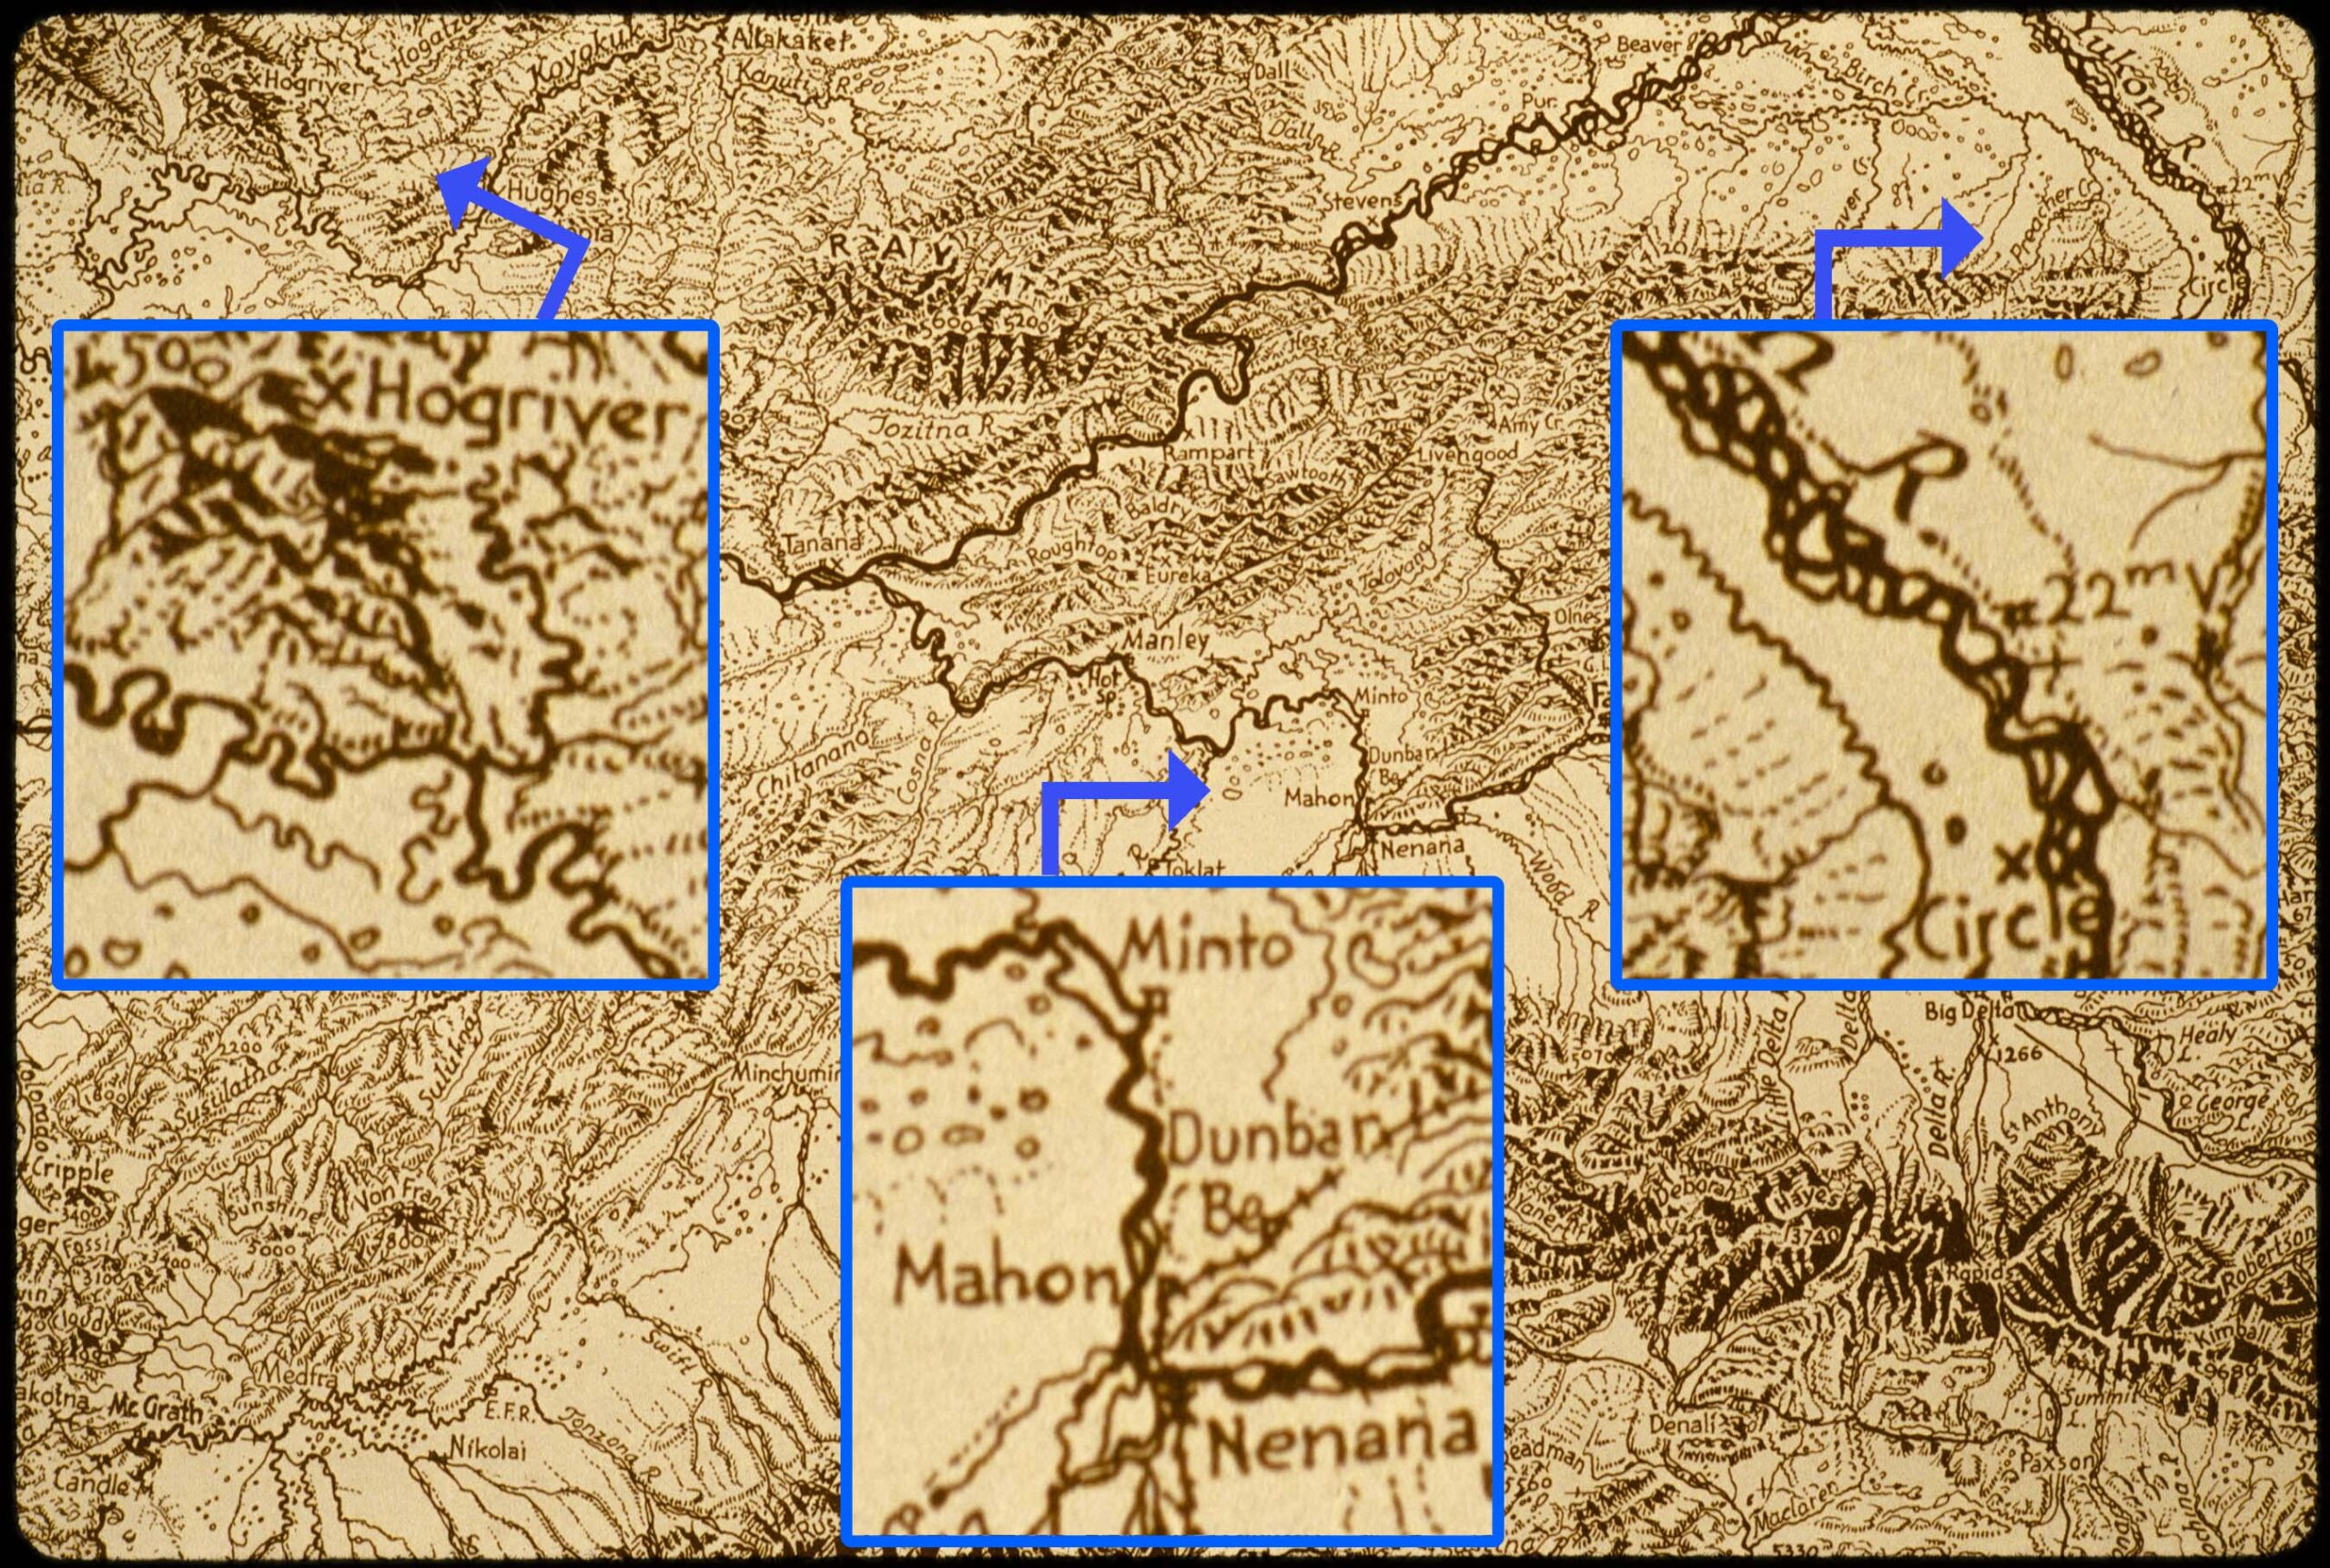
I have also been checking for focus (and general image quality) from edge to edge in the digital copies. I am impressed with the results (Figure 13).
Exposure: Exposure is critical if you want to capture all of the information in your slides. Regardless of resolution or focus, details can be lost in darkened shadows or blown-out highlights. The primary flaw in most digital copies of slides is an increase in contrast and loss of detail in the shadows and/or highlights.
I set the metering method to “Matrix” instead of “Point” or “Center weighted.” That should set the exposure for an average of the entire slide.
For some unknown reason, a lot of my digital copies are too dark. Most need to be lightened by 0.5 to 1.0 stop. So I set the exposure compensation on the camera to +0.7 to +1.3 stops. Sometimes that overexposes other slides. I either have to pull those slides out and repeat them, or start bracketing.
Bracketing: The D5100 can be set to take three sequential photos at different exposures, for example, 1 stop apart. It is then possible to chose the best one or combine them using an HDR merge function (combines photos to incorporate the highlight details from one with the shadow details from another). This is most important with old slides taken with unsophisticated cameras (mine in the 1960s) by unsophisticated photographers (me in the 1960s). But a few of my later slides also vary too much in exposure and dynamic range to allow good copies without special attention.
Camera raw: Saving three bracketed (1 stop apart) camera raw files seems to allow a good result with almost all of my slides. If I am working with camera raw data (e.g., in Lightroom or Camera Raw) of one of the bracketed exposures, by darkening the highlights (all the way) and lightening the shadows (all the way) a very good image can usually be extracted.
Both of the above procedures are critical. Bracketing (taking three exposures of each slide) ensures that one will be appropriate for that slide. The tonal range of that “perfectly exposed” copy of the slide will almost always require major adjustment to compensate for the strong contrast in most slides. This requires that camera raw files be saved when taking each photo. As soon as the copy photo is saved as a jpeg or tiff, the ability to make big tonal adjustments is lost.
My bracketing plus camera-raw recommendation is critical to getting good results, but it has a cost. Camera raw files are typically 15 MB to 25 MB so three of them on your hard drive for every slide you copy can add up fast. It’s a price worth paying for high quality copies.
Cropping: I include the entire area of the slide image so I also capture some of the slide mount. I include more than I need because the projector does not always drop each slide into the same position and I don’t want to crop any of the slide image. I think seeing the inside edges of the slide mount is desirable because of the unique aesthetic associated with color slides. It’s also a shame to discard any of the image.
This means that every slide copy will need some cropping work in Lightroom or Photoshop before anyone else sees it. Although it would be nice to have each digital copy born in perfect shape for viewing I doubt I will ever show the copies to anyone without some fine tuning of each one.
Some early slide formats had taller images than standard 35 mm slides (Figure 14). I had forgotten this when I cut the plywood for mounting my setup and now I can’t move the camera far enough away to capture the entire image of a Super 127 slide. Fortunately, I have found only a few rolls with that format. I will have to copy batches of standard and 126 slides separately to maximize the image size in the copies.
Arranging the slides
For normal projection, slides are loaded into Carousel trays upside down with the emulsion toward the screen. Both of these orientations should be changed for copying slides. This is not critical because the digital images can be manipulated later, but it’s probably worth doing while the physical slides are being arranged.
If viewed from the wrong side, the image in a slide will be mirrored. When copying slides, if you want the digital images oriented correctly, the slides should be loaded into the projector right-side up for landscape photos. To maximize the image in the copies, portrait (vertical) slides must be rotated 90° into landscape position, so the digital copies will always have to be rotated back afterwards. The emulsion side should be away from the camera (Kodak-processed slides had the logo stuff on the emulsion side).
There is an argument to be made for copying slides with the emulsion toward the camera. In that arrangement, there is nothing between the camera lens and the emulsion (where the image is). It probably improves image quality to photograph the emulsion without the film material (acetate or polyester) intervening, but the difference might be unnoticeable except for technical copying. Also, slides are typically concave on the emulsion side and many lenses have a matching concave field of focus. But macro lenses are commonly designed with a flat field of focus, so focus results would be similar either way the slide is oriented.
I have about 20 Carousel slide trays, most of them full of slides. Before copying, all of these slides will be reloaded so they are oriented correctly for copying. During this process, both sides of each slide will be vigorously dusted with a camel’s hair brush and blown free of dust with canned air. The emptied slide trays will first be cleaned with canned air (Note to self: order a few dozen cans of air).
Don’t depend on your computer to remove dust. There are software tools that remove dust in entire images with a click of the mouse, but they can also destroy the fine detail in the image (commercial copying services might do this by default). No reason to capture the film grain structure if you are going to turn it to mush. Other tools that remove individual spots or dust particles are too handy to ignore when cleaning up final images.
A few thousand more of my slides are in three-ring binders full of 20-slides-per-page sheets. Several thousand more slides are in little yellow Kodak boxes. There is a lot of arranging to do.
Curation
With all of this slide arranging, I am tempted to curate the slide collection before copying. An advantage of this is that related slides will get copied together and can be saved into the same or related folders on the computer with the same or similar metadata. On the other hand, computers are good tools for organizing data, and adding the same keywords to related image files can accomplish mostly the same thing.
If you are copying thousands of slides and want them organized in 50 specific folders, wading through the physical slides first makes sense. If you don’t care where the images are in your computer because you can find them by searching, and are willing to wade through the digital images and assign metadata, then maybe don’t bother to curate first. However, when curating your computer database of digital slide images, you will probably need to look at the physical slides to retrieve the film type, the date on the mount, and any notes written on it. So it might be easier to do at least some of that work first so all the Ektachrome slides from Maryland of family in 1964 get copied together and assigned at least those four keywords as they are moved onto the computer.
Curating the physical slides allows them to be put in batches. Each batch can be assigned a list of keywords and maybe other metadata (the Lightroom database has the IPTC data fields for caption, photographer, project name, source, camera model, copyright, date, city, etc., etc.).
Batches can be just a few slides or 140 slides, and sometimes a batch could be one roll of film. To preserve the most historical information, the exposure number on each slide (e.g., 1-20, or 1-36) can be manually transferred to the digital copy. In some cases this chronology can be surprisingly helpful for reconstructing details of what was being recorded in the slides. This will require some effort which might start with gathering and ordering all the (extant) slides from one roll of film. These can be copied in order and later the exposure number can be added to metadata.
If you will not be using Lightroom, you should think carefully about what you will be using to view and organize your archive of slide images. This might be the time to start paying $10/month for Lightroom, although your fantastic Lightroom database of slide images disappears when you stop paying.
A related issue is whether you should copy all of your slides or just the good ones. I shot a lot of slides between 1965 and 2005. Most of them are of trees. I don’t even remember where a lot of those trees were or why I took the photo. Nobody is ever going to be interested in those tree slides.
To discard a slide I will want to look at it carefully and this will be much easier to do on a computer. It takes only 20 to 30 minutes to copy a tray full of 140 slides. Maybe I will copy all of them. Does that mean I will curate thousands of slides first? Whose idea was this anyhow?
Control
To manually advance the projector to the next slide, the button on the projector or a wired remote can be used. To trip the camera shutter without shaking the camera, a remote (wired or IR) can be used or the self timer feature can delay shutter release for a few seconds. Most projectors and cameras will have some or all of these options. If you are copying just a few hundred slides, manually pushing buttons for each one is a viable plan.
Tethering
Adobe Lightroom Classic allows a camera to be connected via USB so when a photo is taken it is saved to the hard drive and added to the Lightroom database. Each batch of slides copied this way can have a unique set of metadata saved with the images, and the images can be saved to a selected directory. This can produce a well-curated archive as soon as the images arrive at the computer, although only if someone has done the curation in advance. Lightroom supports only some cameras for tethering. If you already use Lightroom and have a compatible camera, this can be an efficient workflow. I tried it and it is well implemented in Lightroom. I am not familiar with other tethering solutions, but the free digiCamControl (http://digicamcontrol.com/) seems to offer the basics and works with many cameras.
Automation
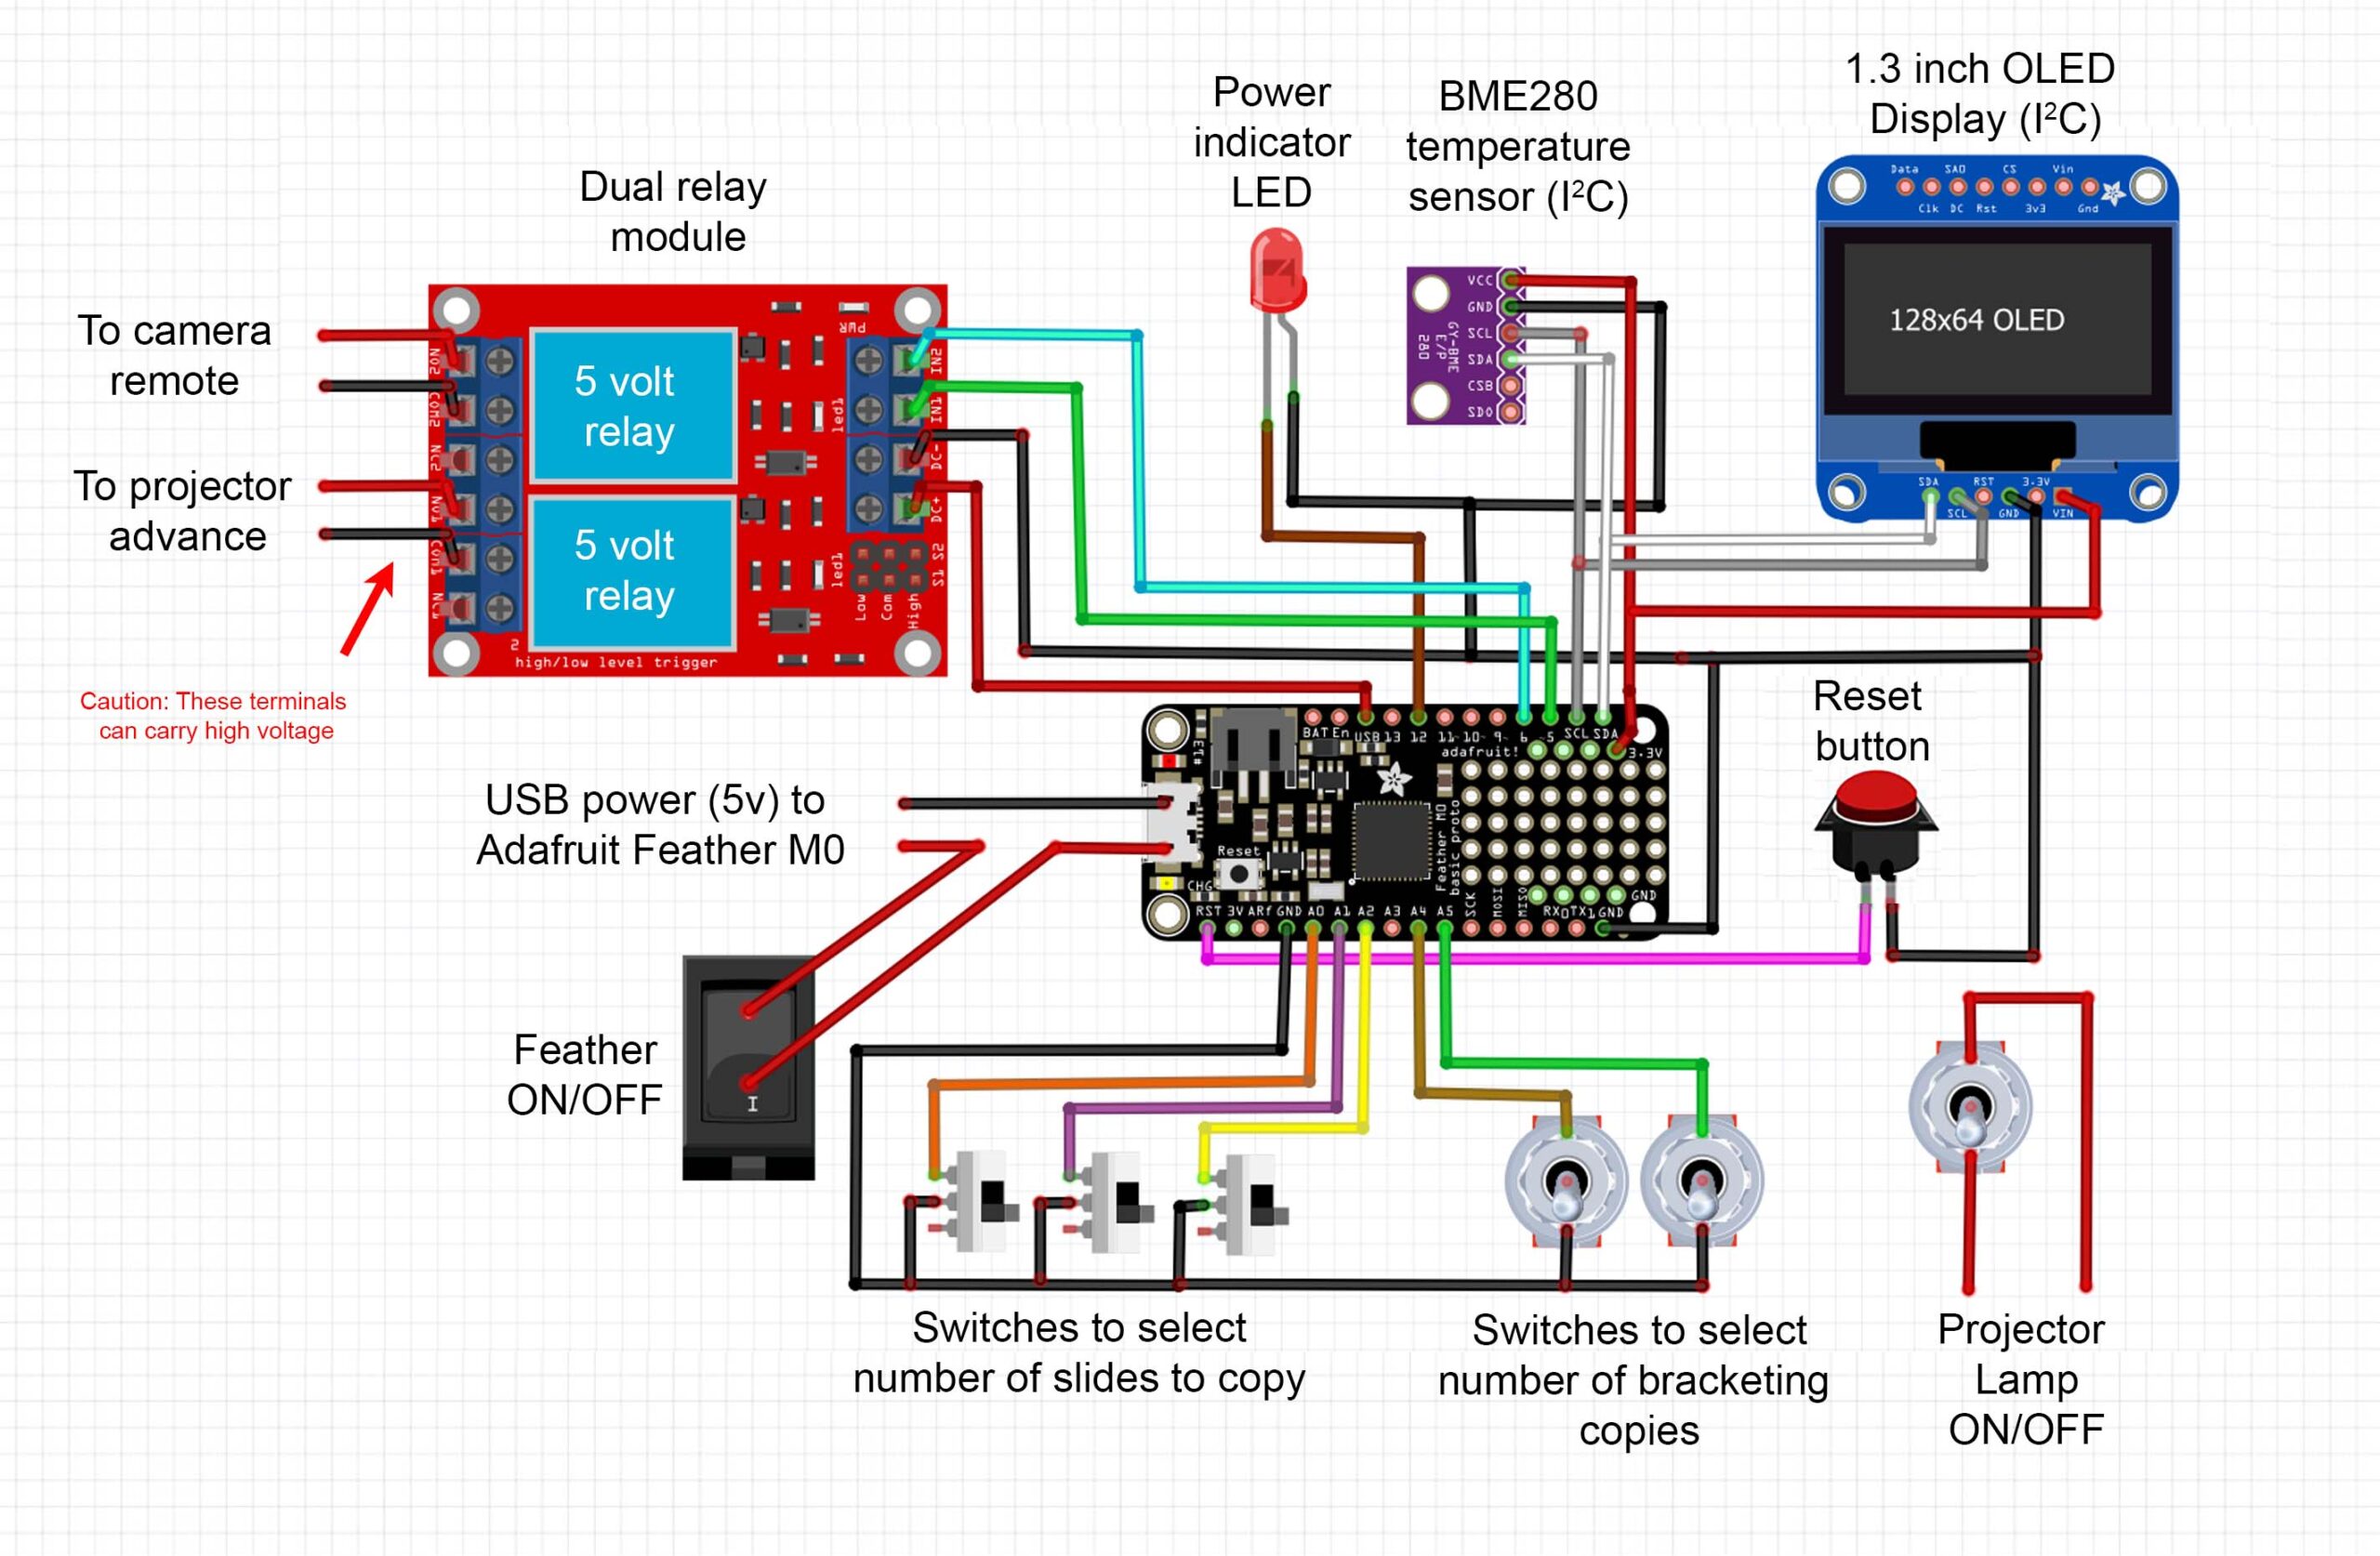
To automatically shoot copies of a tray full (or partly full) of slides, a microcontroller and relays can repeatedly advance the projector and trip the camera shutter (Figure 15). This is a very easy task for the most basic microcontrollers like Arduinos (Uno, Nano, Pro Mini).
When you press the button on a Carousel projector’s wired remote to advance to the next slide, the button is completing a circuit. The remote is not sending an electrical signal, it is just making an electrical connection so current can flow. An Arduino and relay are designed to do just that and can do it at any interval. The same is true of camera wired remotes — press a button and a connection is made so current can flow through the remote. A relay can make that connection.

The remote port on my Nikon DSLR requires a unique cable (N3) which I bought for $10.00. The N3 end of the cable plugs into the camera and the other end is a stereo jack with three rings. When the cable is plugged in to the camera, the shutter can be triggered by shorting all three rings on the stereo jack. So I soldered wires directly to the stereo jack rings and ran them to the relay module (the tip and ring 2 got connected to COM on the relay, ring 3 to NO). When the Arduino sends a signal to close the relay, the camera takes a photo. Connecting rings 2 and 3 on the stereo jack triggers a shutter button “half-press,” and the camera focuses. That is irrelevant to my lens, and auto-exposure seems to be continuously updated. So for me there seems to be no benefit from doing a half-press before shooting.
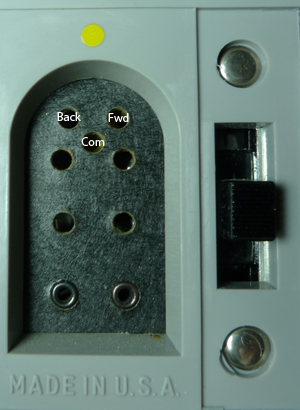
It’s even easier to connect a relay to the projector. You can take apart the wired remote (three screws) and connect the two wires from the relay. This is non-destructive so it will still work as a remote. Or you can plug the two wires from the relay directly into the port on the projector where the remote plugs in. The projector will advance to the next slide if you connect two of the five pins at the port (Figure 16).
If an Arduino is operating the relays, the Arduino needs a program (Figure 17). The program (sketch) to take a photo of each slide needs fewer than 20 lines of code (below). This sketch will fit in 3% of the memory of a 328p Arduino (Uno, Nano, Pro Mini).

Advanced advancing
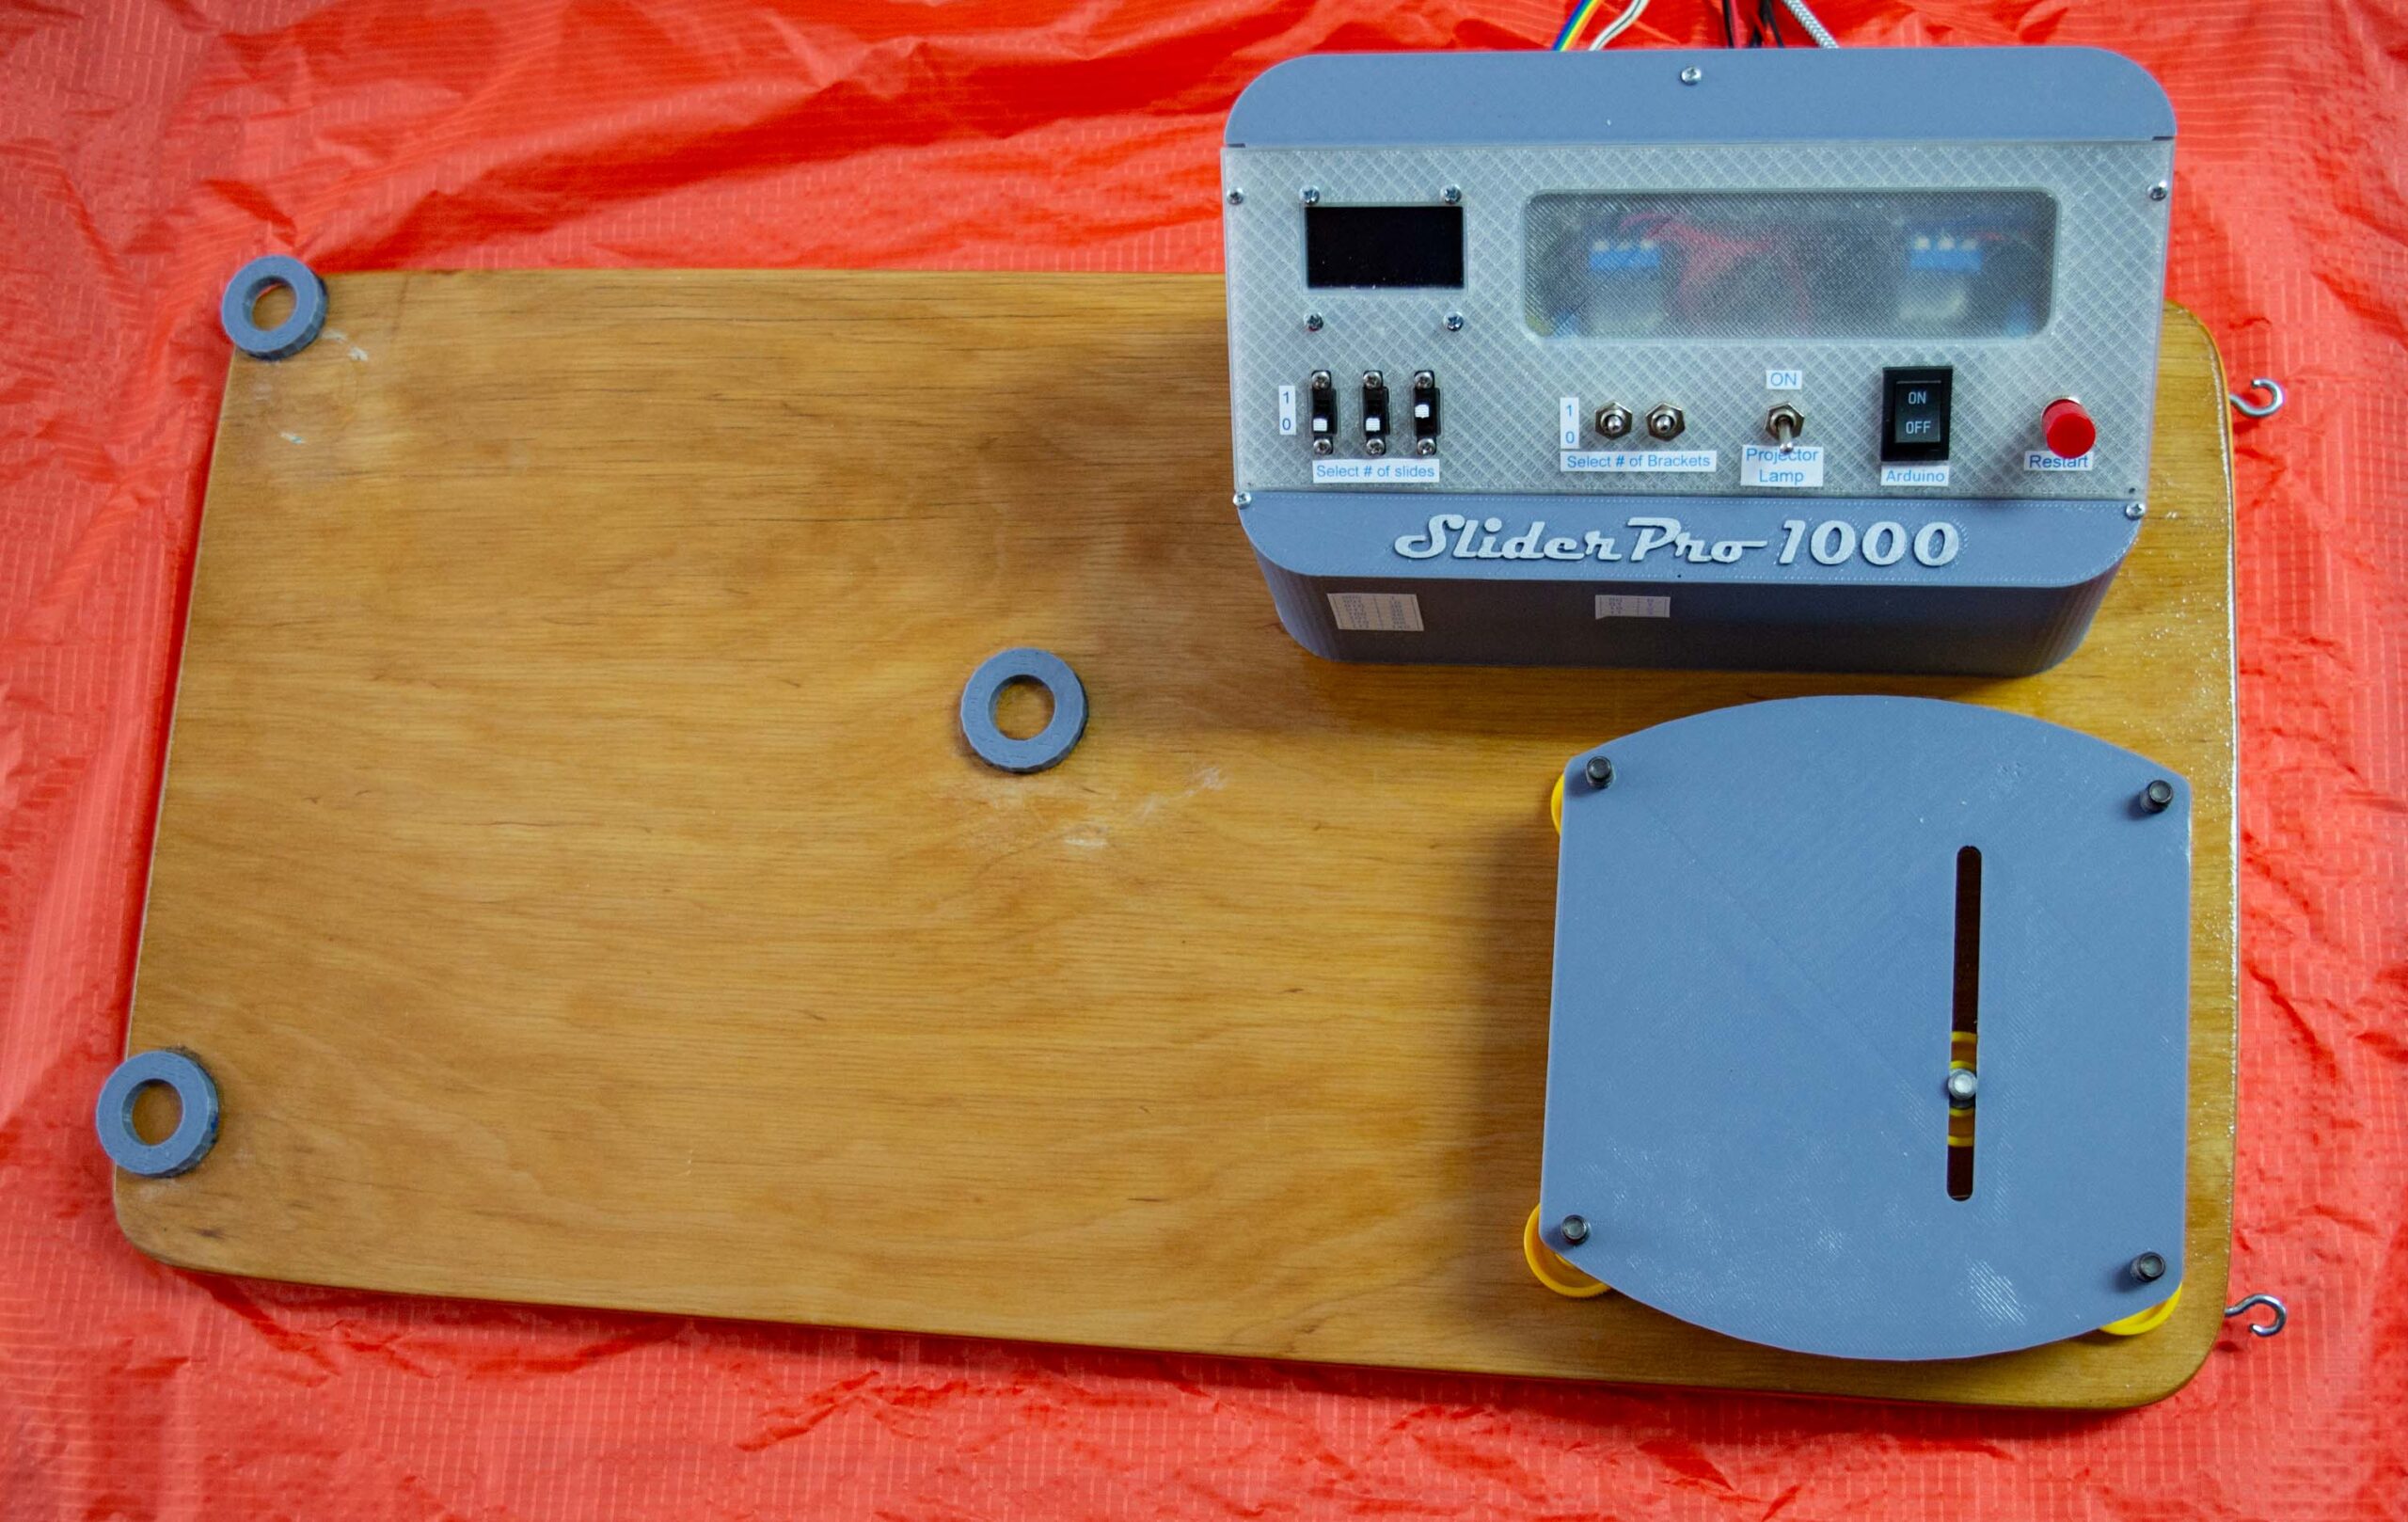
If you are familiar with Arduino, you will not be satisfied with either the hardware or software described above and your mind is already racing. When I finished building my console to control the projector and camera, the sketch running on the Arduino had 120 lines of code and was too big to fit on a 328p Arduino. I am very pleased with my console (Figure 18) which has lots of features, none of which improves speed or image quality.
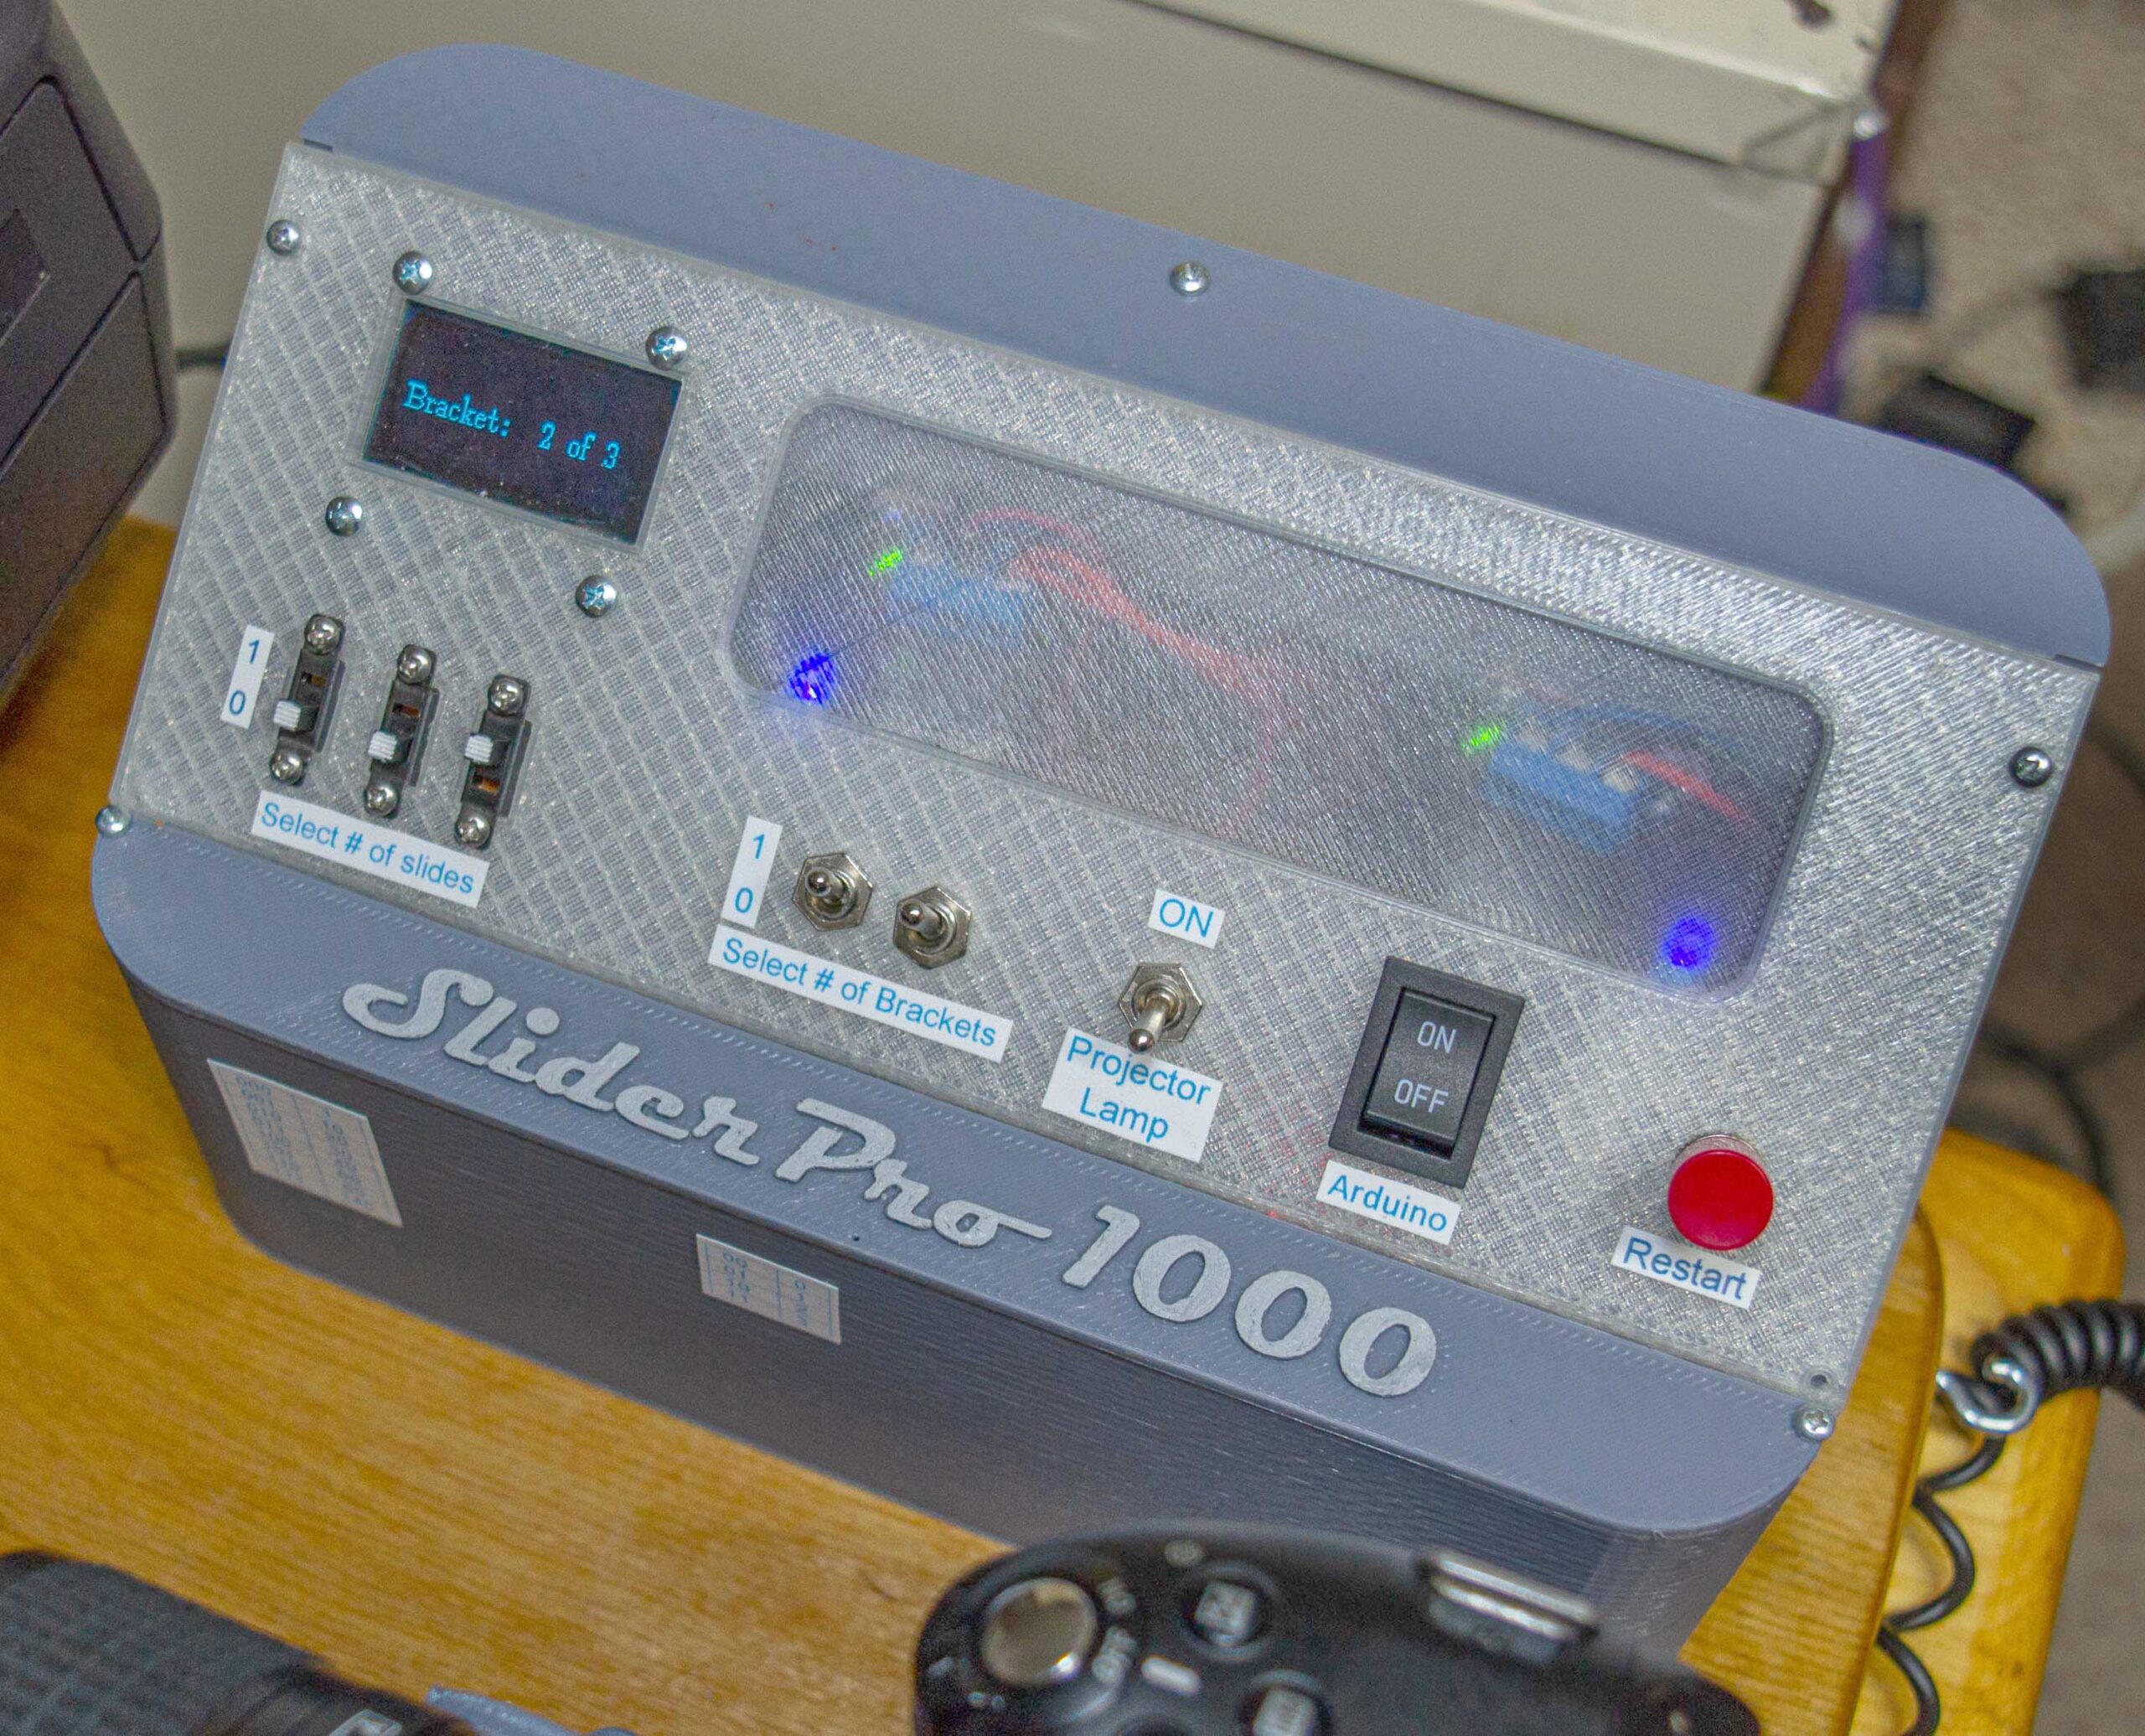
Features of the SliderPro 1000:
- The microcontroller is an Adafruit Feather M0. An Adafruit ItsyBitsy M0 does the same thing and costs $12 instead of $25, and a $6 ESP8266 should also work. The sketch will not fit on an Arduino 328p but runs in 11% of the program memory of the ATSAMD21 Cortex M0 processor of the ItsyBitsy.
- Two relays, same as in Figure 15. $5.00 for both.
- 1.3″ OLED display. This requires a lot of program memory, but the pixels are blue! $7.00.
- Temperature sensor (BMP280) placed inside the projector lamp housing. $1.00.
- Three switches to select the number of slides to copy. Eight (23) choices are available. $1.50.
- Two switches to select the number of duplicates to take of each slide. Four (22) choices are available for exposure bracketing (only 1 and 3 are currently relevant). $1.50.
- Lamp switch, Arduino power switch, reset button. Each costs less than $1.00.
So the electronic components that provide all of that functionality cost less than $25. You can also spend half that much to automate the process and get the same quality of copies (see Figure 15) and that version is much easier to build.
Although the display and switches contribute nothing to speed or image quality, they were very handy when I was tinkering with the camera and projector trying to get everything working properly. After the system was adjusted and proven, the console contributed little other than style. Not that there is anything wrong with that.
Easily switching between one copy and three copies of each slide is handy for bracketing exposure, but it is not essential. Instead you can load onto the Arduino a sketch to take three photos of each slide when you want to bracket (the camera does the bracketing) and load another sketch when you want single copies. Or always use the single copy sketch but process each tray of slides three times with different exposure compensation values.
Results
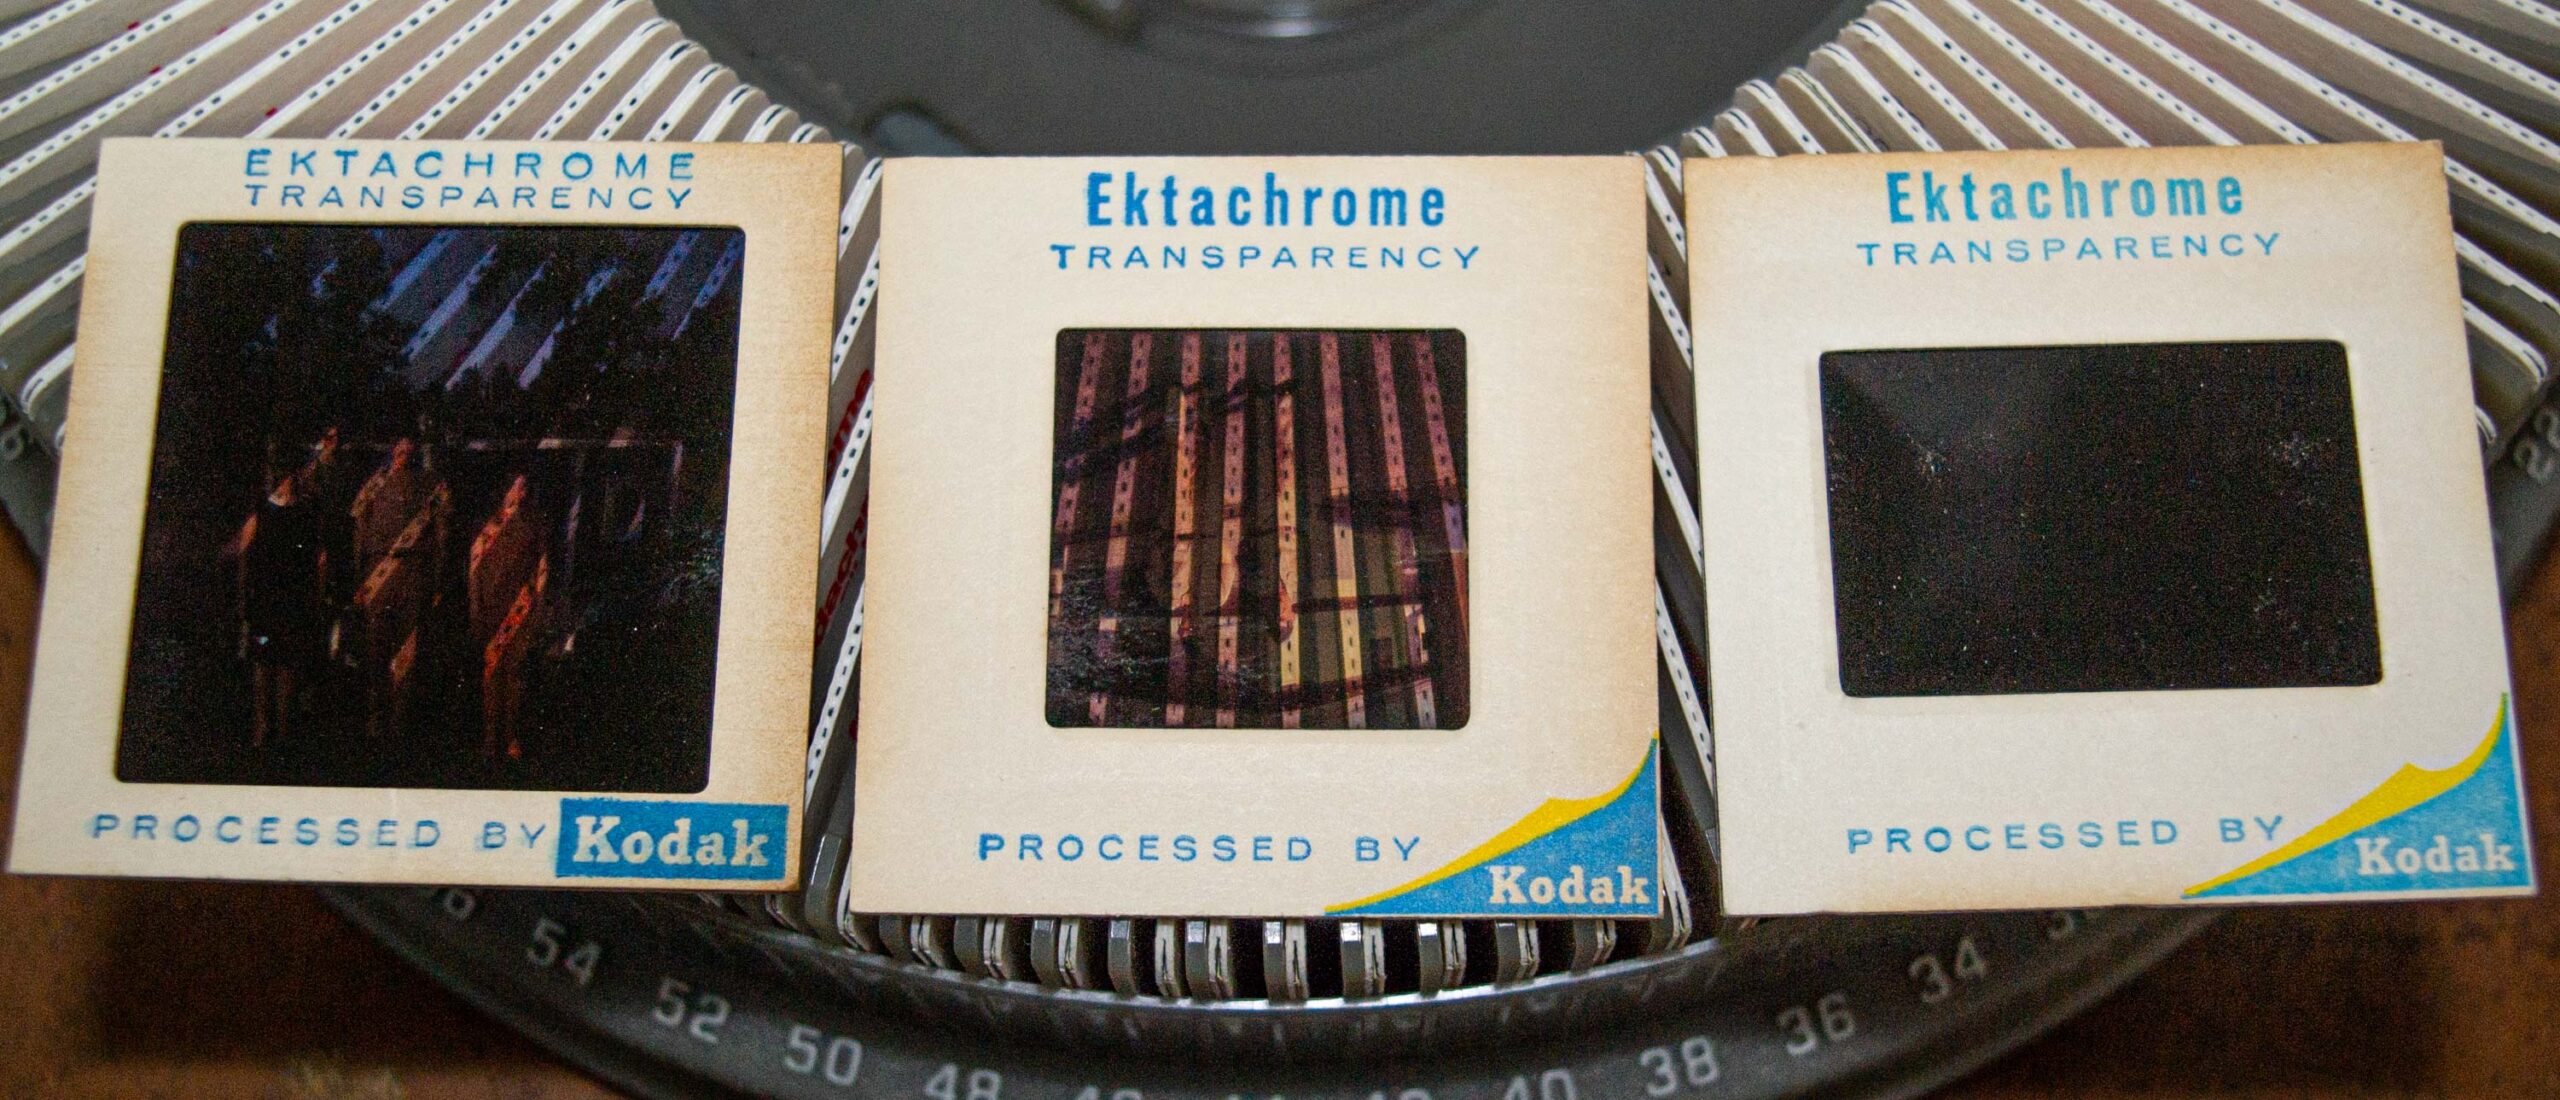
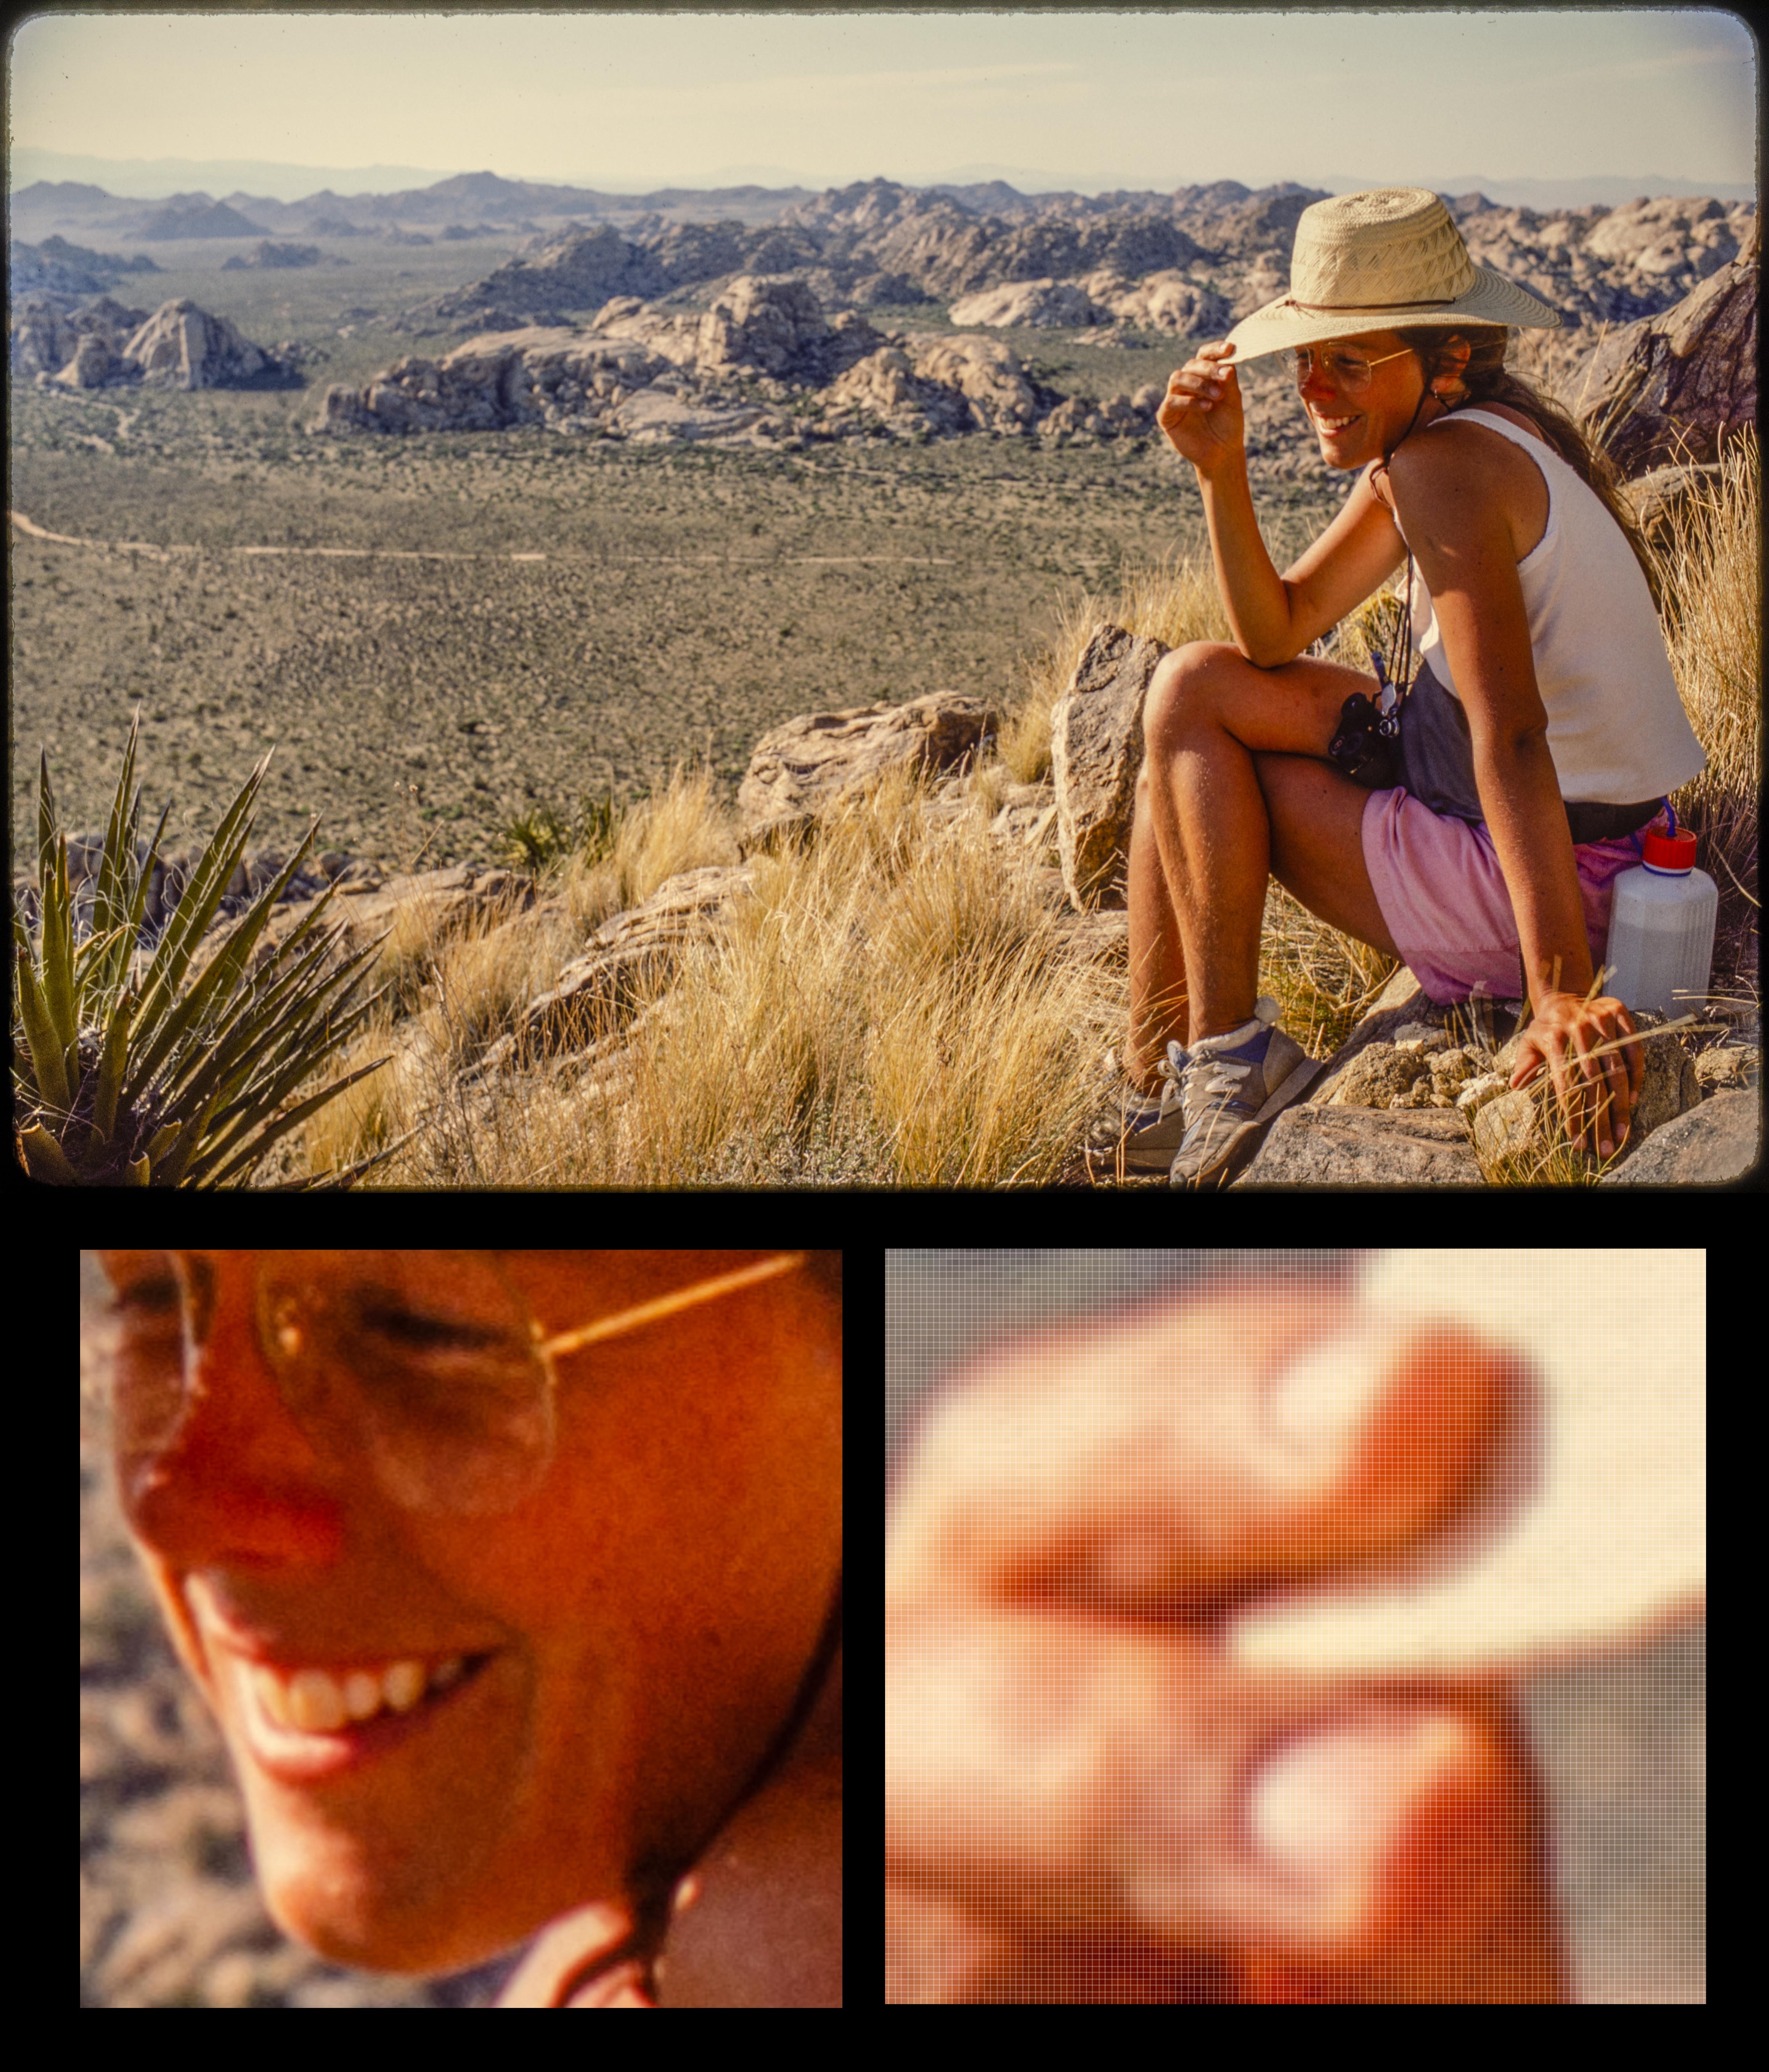
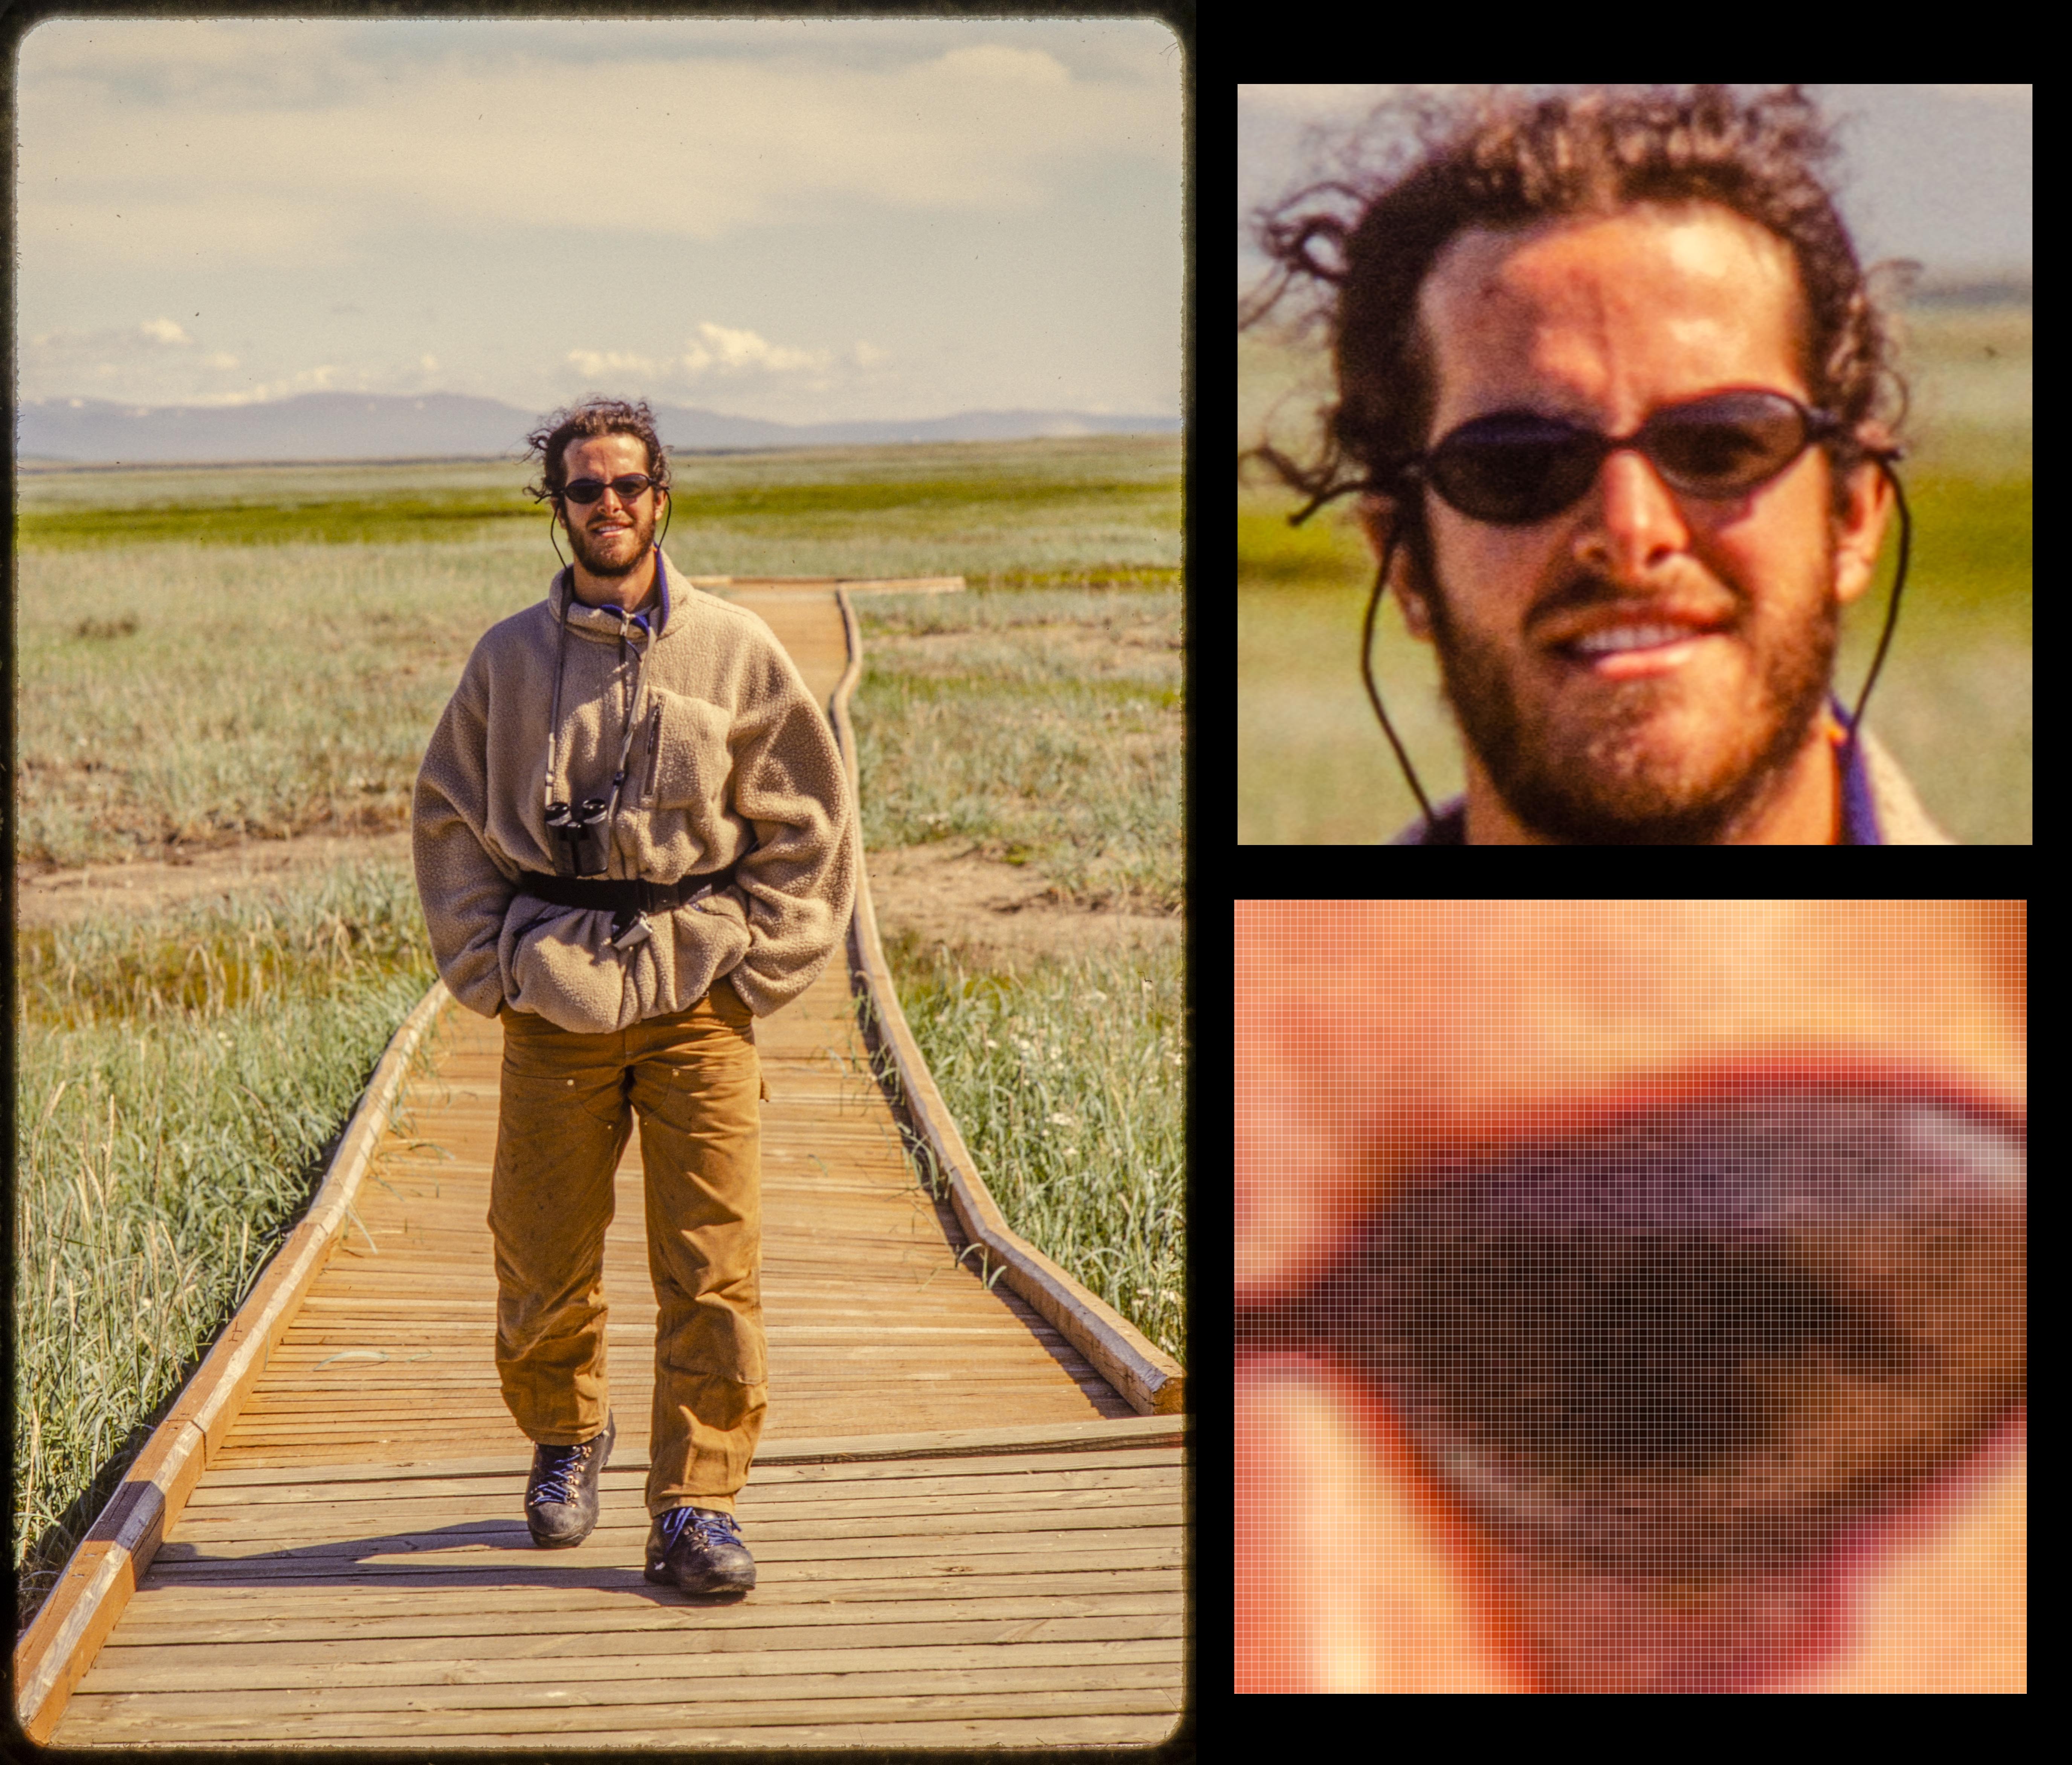
In the three photos below, Kodachrome film “grain” can be seen in the faces of the good people if you zoom in enough. You must zoom in quite a bit farther to see the pixels in the digital copies (each image is ca. 5000 x 3300 pixels). Because these copies capture good detail of the film grain, they have the potential to capture all of the information in the slides (barring lost highlights or shadows).
If you click on them and then ‘open image in a new tab’ you can zoom in to see the pixels in the extreme close ups. So far I have not noticed any information in the slides that I am not capturing.
These digital copies were exported from Lightroom as tiffs to preserve the pixel structure which is then displayed as a matrix in Photoshop. The images below are jpegs with full resolution (16 MP, except that some pixels were lost when cropping to the slide mount). The exposure, contrast, and color were adjusted in Lightroom, but no other changes were made (e.g., no Clarity, Texture, or Dehaze).

The three examples above are nice photos and maybe the copies deserve the careful process, good image quality, high resolution, and individual post-processing. For most of my photos there may be no need for this obsessive attention, but with a searchable database of 15000 images maybe it will be worthwhile reliving the photographing of all those trees.
Resources
There are lots of people using digital cameras to copy old film, slides, and photographic prints. Peter Krogh has perfected much of the process and has made a business out of explaining how to do it. There is a one hour 40 minute YouTube video of him sharing his knowledge and it is worth watching even though he never mentions using a projector. His website and book about copying photos are linked at the video, but the book costs money. The video is free.
There are also quite a few YouTube videos about using a projector to copy slides. Some have helpful hints, but one guy who understands the electronics made a one hour 33 minute video about automating the process. He builds or describes three electronic systems to operate the camera and projector without using an Arduino. It is interesting without being especially helpful.
I have not finished watching either of these videos because there is only so much attention I can commit to one topic. I have just about reached that limit.
[Update: I created a new product at the KAPtery with additional components I bought while developing some of the hardware discussed here. The SliderPro 200 is available here: http://www.kaptery.com/product/sliderpro-200.]
Great description. Appreciate your attention to details, which resulted in excellent results. I will begin with camera on tripod etc. Lots of kodachrome slides plus all colour negatives of course.
For a quick overview of a few popular film holders for scanning, see the YouTube video “Film Holders for scanning – Summary of popular options” at https://www.youtube.com/watch?v=g-jAtXY_c1o. These are not automated solutions, but the ones in the video (and others I’ve seen) handle negative strips.
Those “popular options” look good. None will work with mounted slides, so they hold individual negatives or strips of film. Some of them slide the film strip from one exposure to the next, which seems risky. I’m surprised there is no solution which holds a strip of six 35mm negatives in a holder and allows the holder to be slid sideways to the next exposure. That eliminates the risk of scratching the negative and is a simple mechanism to make.
A quick search at Thingiverse for “film holder” returns many 3D printable models of film holders (simple frames to hold a strip of negatives). It would be easy to add a rack along which the film holder could be slid. Maybe I will make one. When copying negatives with a digital camera, this would allow you to copy six negatives with minimal fumbling and refocusing. Not automation, but better than what I am doing now.
Hi Chris: Very nice detailed article – thanks for this. I’m not sure that I need to do all of this as I was able to steal/borrow a friends Nikon scanner a while back but I like imaging how I might have done it…
This raises the question about scanning the negatives. Have you put as much thought into that? Had I known that I ever might have wanted to do that perhaps I wouldn’thave cut them into strips – I have three Patterson binders of negatives all nicely stored. Mind you, that means they are dated and labelled – which is good!!!
I’ll give credit to Will for the referral to your blog.
Thanks Richard,
Strips of negatives present a different challenge to digitizing, and I assume I will never get around to digitizing my 14,000 B&W negatives. But I never considered copying thousands of color slides until I heard about people using an old projector to do it. I did a few tests and learned not only that the process could be automated but that the results were superb. As far as I can tell, 100% of the information in the slides can be captured, the copies are beautiful, hundreds of slides can be copied with little intervention, and there is no damage to the originals. Spending $350 on a used camera and lens was the best investment I have made in a long time.
With this camera equipment, it is simple to make excellent copies of B&W negatives, but automating the process is not so easy. Mounted color slides are designed to be precisely handled by a machine that a lot of people already own. Negative strips are not. It’s not rocket science to build such a machine for negatives, but it might have a sky high price if one becomes more widely available.
That’s too bad, because as you mention, negatives are often better organized than slides. For example, all of my negatives from the same roll of film are still together. If only I had written the date on the glassine envelopes.